Suet was apparently used both raw and rendered (refined) in 18th century cooking. While some of the original recipes specified the use of rendered suet, most seemed to leave the option open. It is fairly common for recipes to instruct the cook to make sure the suet was free from all skin (connective tissue) and blood vessels. This, of course, suggests the suet was being used raw. I suspect the decision between using raw suet and rendered was ultimately determined by what the cook had on hand.
Raw suet perishes fairly quickly. If you are using raw suet in your recipe, you must keep the suet refrigerated. In addition, fresh suet should be used within a few days. Properly rendered suet, on the other hand, will keep for months at room temperature.
The rendering or refining of suet is accomplished by heating the raw suet to separate the fat from the remaining connective tissue, blood vessels, etc., but at a low enough temperature that the connective tissue isn’t fried.
When Rundell spoke of “skin,” She was referring to the connective tissue the runs throughout suet.
Suet is filled with connective tissue
If you are using raw suet in your recipes, this connective tissue needs to be removed as thoroughly as possible. Removing it completely, however, is virtually impossible without rendering the suet.
The connective tissue must be picked as much as possible before using the suet raw.
For our video, we picked our suet down to about 1/2″ to 1″ cubes. We made sure to pick only the cleanest, whitest suet from the entire piece.
Even when finely diced, some of the connective tissue is still present.
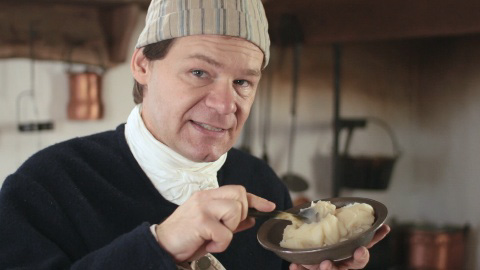
We then finely diced the suet into pea-sized pieces. Our suet was ready to use for such recipes as boiled pudding, haggis, and dumplings.
If you are unable to use your suet right away, or you wish to further process your suet making it shelf-safe for use at a later time, you will need to render it. Start by placing the suet in a cooking vessel. We suggest an iron pot as the rendering process will also contribute to the on-going seasoning of the pot.
You’ll need to place the pot near the fire but not over it. This process may take several hours to complete. Don’t rush it. As Rundell suggests, cooking the fat and connective tissue will cause the fat to have a strong meaty flavor.
A modern alternative to this process is to place your chopped suet into a slow cooker set on low. Be sure to leave the cooker uncovered. Besides separating the fat from the connective tissue, rendering also evaporates moisture that exists naturally with the fat. Leaving the lid off your slow cooker will ensure that no moisture is trapped in the cook pot. An alternate modern method is to warm your suet in a baking dish in your oven set on its lowest temperature. Do not use your microwave. It heats too quickly.
Which ever method you use, keep the temperature low and be patient with the process. You’re not only separating the fat from connective tissue, but you’re also driving off moisture — while avoiding frying the contents of your pot.
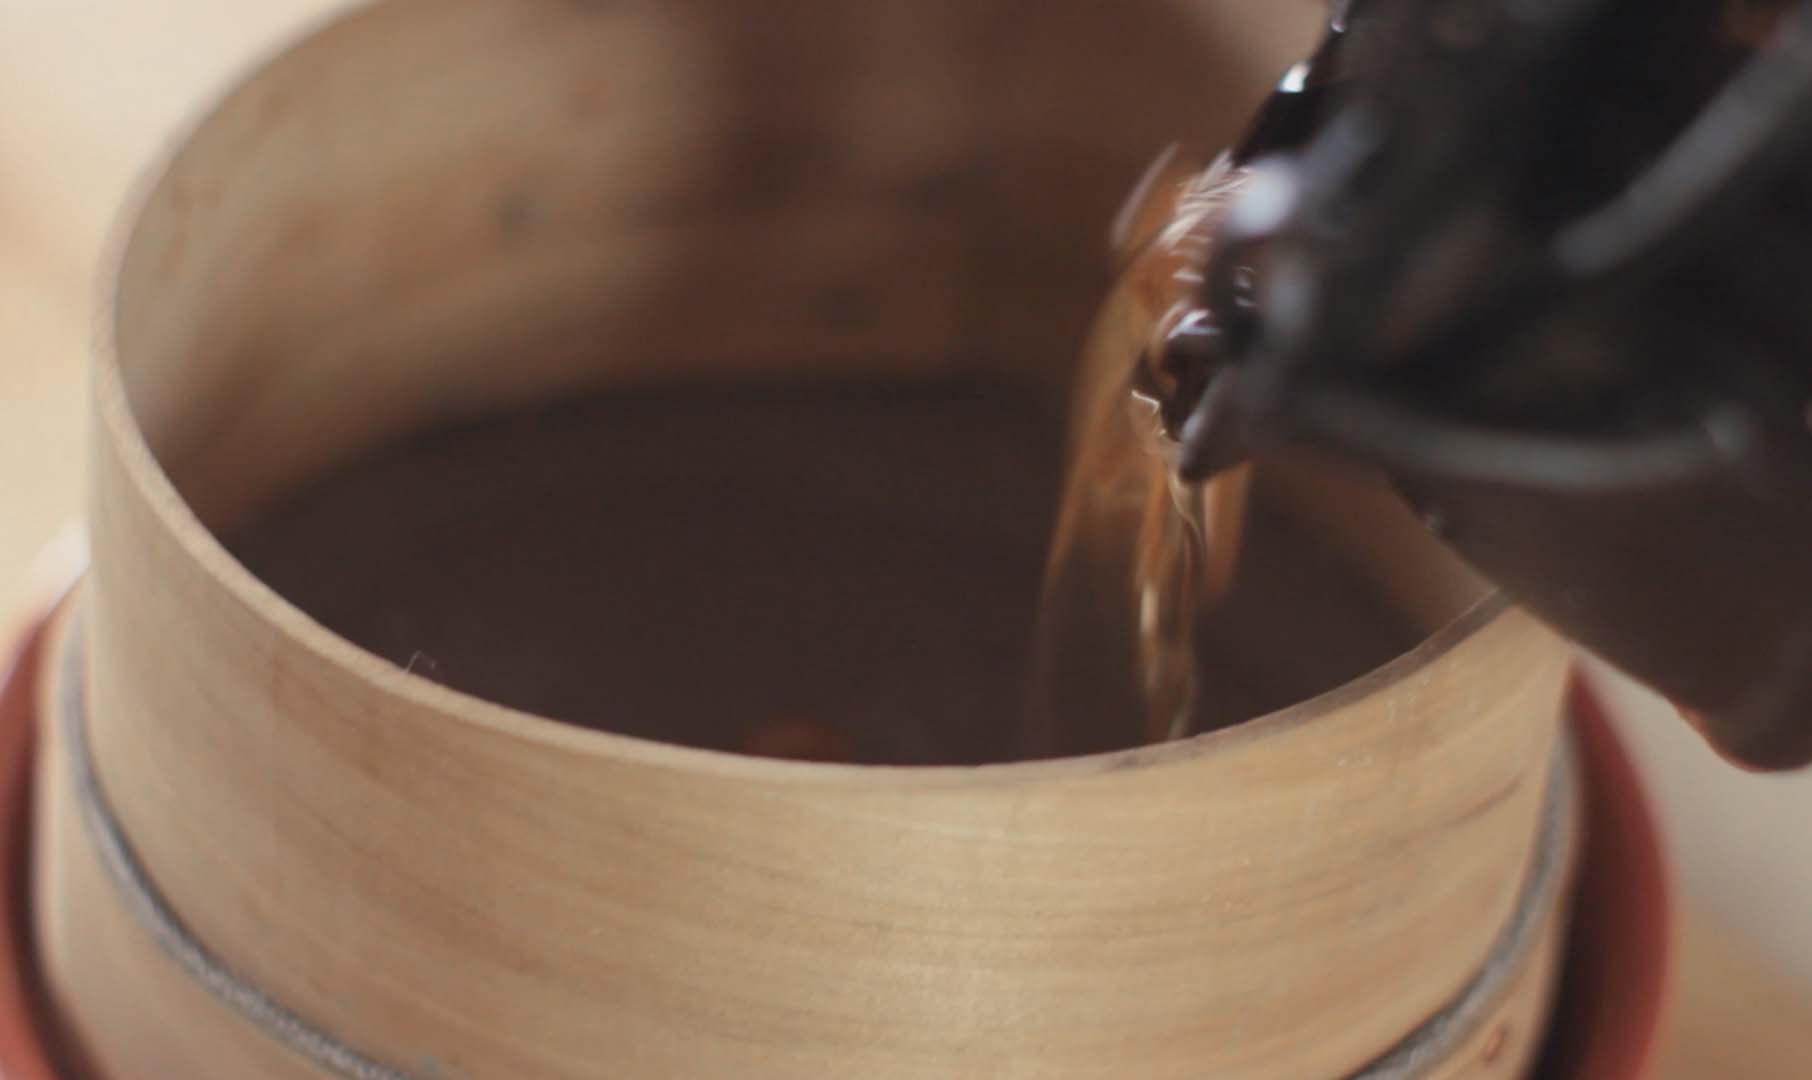
After several hours after the fat is completely liquefied, stain it through a sieve or a clean cloth.
Graves
The remaining particles of connective tissue, called graves, can be discarded. I have found one reference in 18th century literature that indicated graves were sometimes used as fish bait. In our experiments, we weighed the graves as well as the final rendered suet or tallow and compared it to original weight of the well-picked raw suet. The graves accounted for about 25% of the total weight — even with fairly meticulous picking.
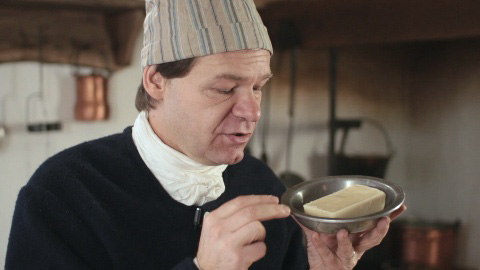
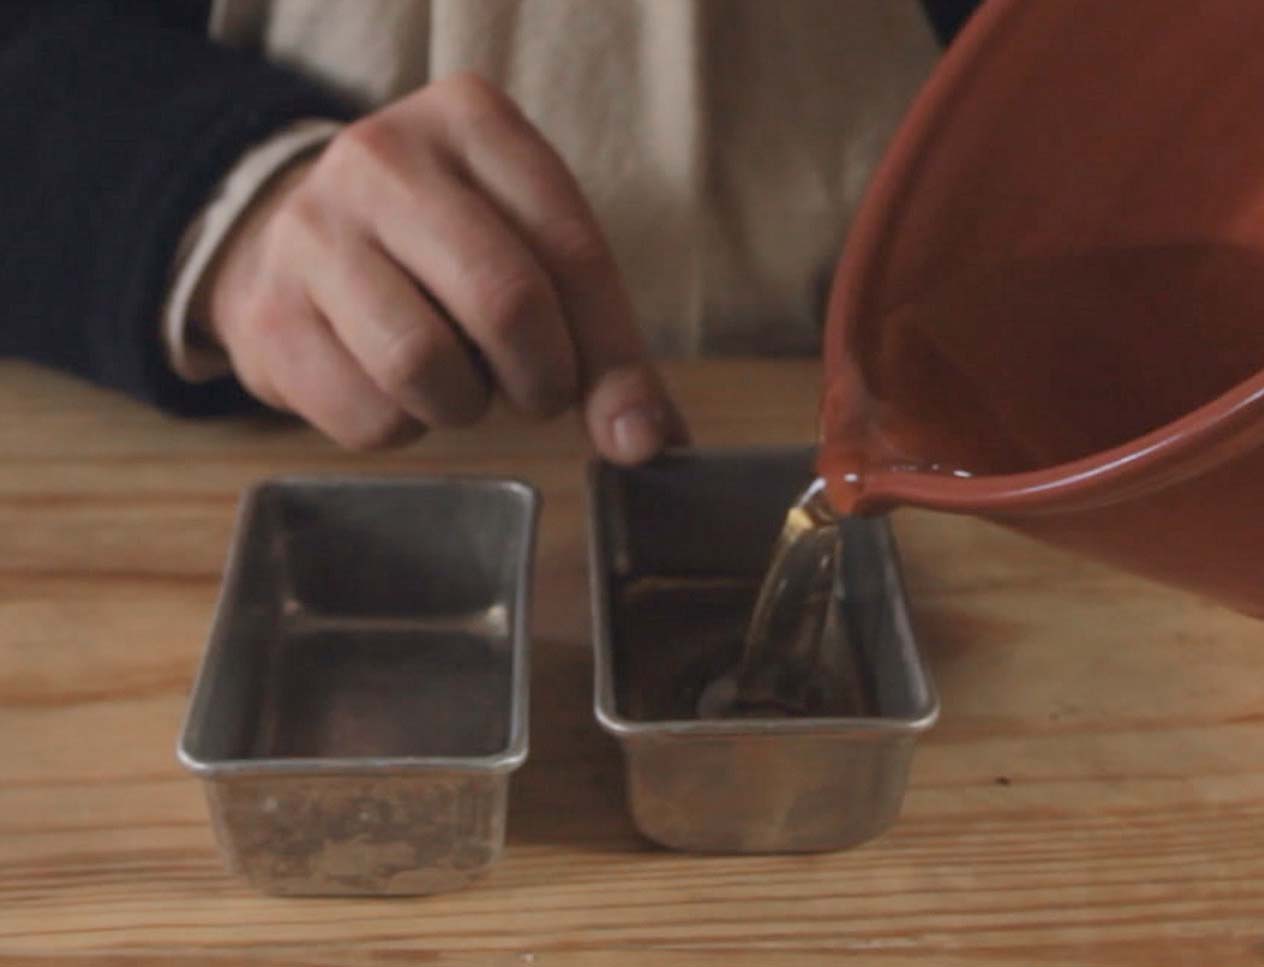
Once you’ve strained the molten suet free of graves into a bowl, transfer the suet into pans for cooling. Rundell suggests pouring the suet into cold water. This further refines the suet by settling out any particles. Some modern rendering techniques suggest a secondary rendering as well to ensure that the moisture is completely driven off.
When the suet has solidified, it can be removed from your molds, wrapped in paper, and then placed in a cloth bag for storage in a cool dry place.
This rendered suet or tallow can be grated for puddings and dumplings, or it can be melted for deep frying and sealing jars of preserved fruit or jams. In my next post, I’ll present some recipes that typify the various types of 18th century foods in which suet was used.
In my last post, I took a brief look at the important role suet had in 18th century foodways as well as in life in general. I gave an over-simplified explanation that suet is the hard fat from the loins of beef and mutton. I’d like to add a little more meat, so to speak, to that definition.
Beef suet can sometimes be a bit difficult to find here in the United States. I suspect that much of it ends up rendered, mixed with peanut butter and birdfeed, and packaged into blocks of winter-time bird food. Suet is a perfect high-caloric attraction for all my feathered friends who decide to stick out the cold northern winter with me.
I recently stopped at a well-respected butcher’s shop in the area. After my unsuccessful search for suet at five local grocery store meat departments, I was pleased when the butcher trotted out of the cooler with a 10-pound bag of the white stuff. My pleasure turned to disappointment, however, when I opened the bag at home to discover that he had just hoodwinked me with 10 pounds of hard muscle fat. It’s not the same thing.
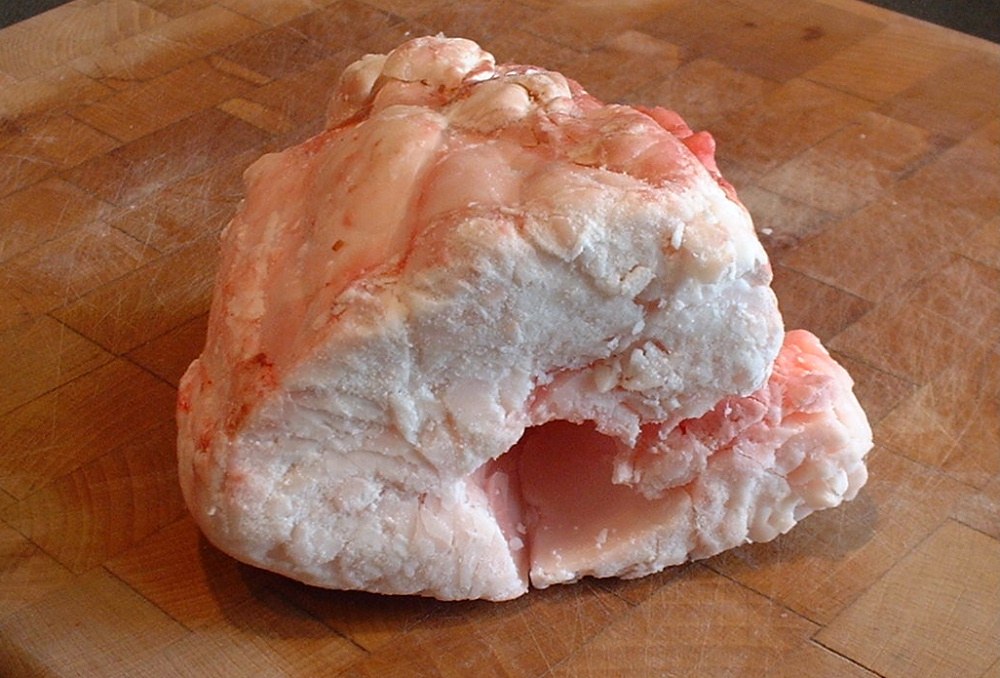
Real suet is located on the inside of loin area of cattle and sheep. It is the hard fat that surrounds the animal’s kidneys. If you ask your butcher for suet, be sure he or she understands that you want kidney fat.
Muscle fat (left), suet (right)
The difference between hard muscle fat and kidney fat may not be all that apparent up front. They both can be quite stiff and look much alike. The real difference can seen during and following the rendering process.
Suet, as opposed to muscle fat, contains a higher level of a triglyceride known as glyceryl tristearate, otherwise known as stearin. The result is that suet has a higher melting point and congealing point than regular fat.
Boiled Puddings
This little point of trivia is important in order to understand the old English recipes. Suet is grated or picked into small pieces as part of the process of preparing it for cooking. When mixed with other ingredients — let’s say the a batter for a traditional boiled pudding, the particles of suet retain their mass well into the cooking process. When the melting point of suet is finally reached, the surrounding batter has already begun to set. By the time full baking temperature is reached within the pudding, the suet has melted, leaving a void in the batter.
Consequently, the use of suet in such dishes as puddings, dumplings, and mince pie results in a spongy texture. If the lower-melting muscle fat is used in suet’s place, the fat will melt before the batter has a chance to set, resulting in a much heavier final result.
Not only is suet used for textural purposes, but it is also used to add moisture to the dish without adding a strong meaty flavor that is so common with muscle fat. Suet has a much milder flavor.
I went ahead, for experimentation purposes, and rendered some of the muscle fat the butcher passed off to me as suet. Beyond the fact that my entire house smelled for three days like one giant broiled steak, the rendered fat I ended up with resembled a side dish of my grandma’s runny mashed potatoes. But unlike my grandma’s mashed potatoes, my rendered muscle fat never hardened, even when it was cold.
Jon with a bowl of rendered muscle fat
This may seem strange, but I generally keep a couple of gallons of commercially rendered tallow within reach here at the office. I use it to make a couple of products here at Jas. Townsend & Son. “Tallow” is a general term that means rendered fat. Tallow can be made from suet, or muscle fat, or a combination of both. The texture of tallow varies broadly, however, depending on the raw form of fat from which its made. So if you find yourself someday in the reenacting mood to make tallow candles, this is an important bit of information to know. You simply cannot make candles with tallow rendered from muscle fat.
Jon with a solid bar of rendered suet
Rendered suet, on the other hand, will congeal into a solid chunk. (I’ll talk about the actually rendering process in my next post.) The chunk I made felt like a bar of beauty soap. Mix rendered suet with a little lye and a chemical reaction occurs that results in water-soluble sodium stearate — the primary ingredient in most hand soaps.
Oh, one other thing: Just like beef muscle fat, pork lard is an unsatisfactory substitute for suet. You may have a difficult time distinguishing by sight between a lump of lard and a lump of suet tallow, but don’t even think about using it as a substitute.
Now in my previous post on 18th century Christmas pies, as well as in the accompanying video, we suggested using vegetable shortening as a suet substitute. Admittedly, it’s not a very good substitute, but it does provide the moisture without adding a strong flavor.
The problem is that while vegetable shortening’s melting point is relatively the same as suet, its congealing point is much lower. What that means is this: when we shot the video, we had to freeze the vegetable shortening in order to grate it. Then we had to keep it frozen until the very last second. But even then, the moment we added the grated vegetable shortening to the other ingredients, it lost its mass and acted like room-temperature butter, coating the other ingredients rather than retaining its particle shape. The final result was still a delicious pie, but it didn’t have the desired spongy texture that would have resulted from using suet.
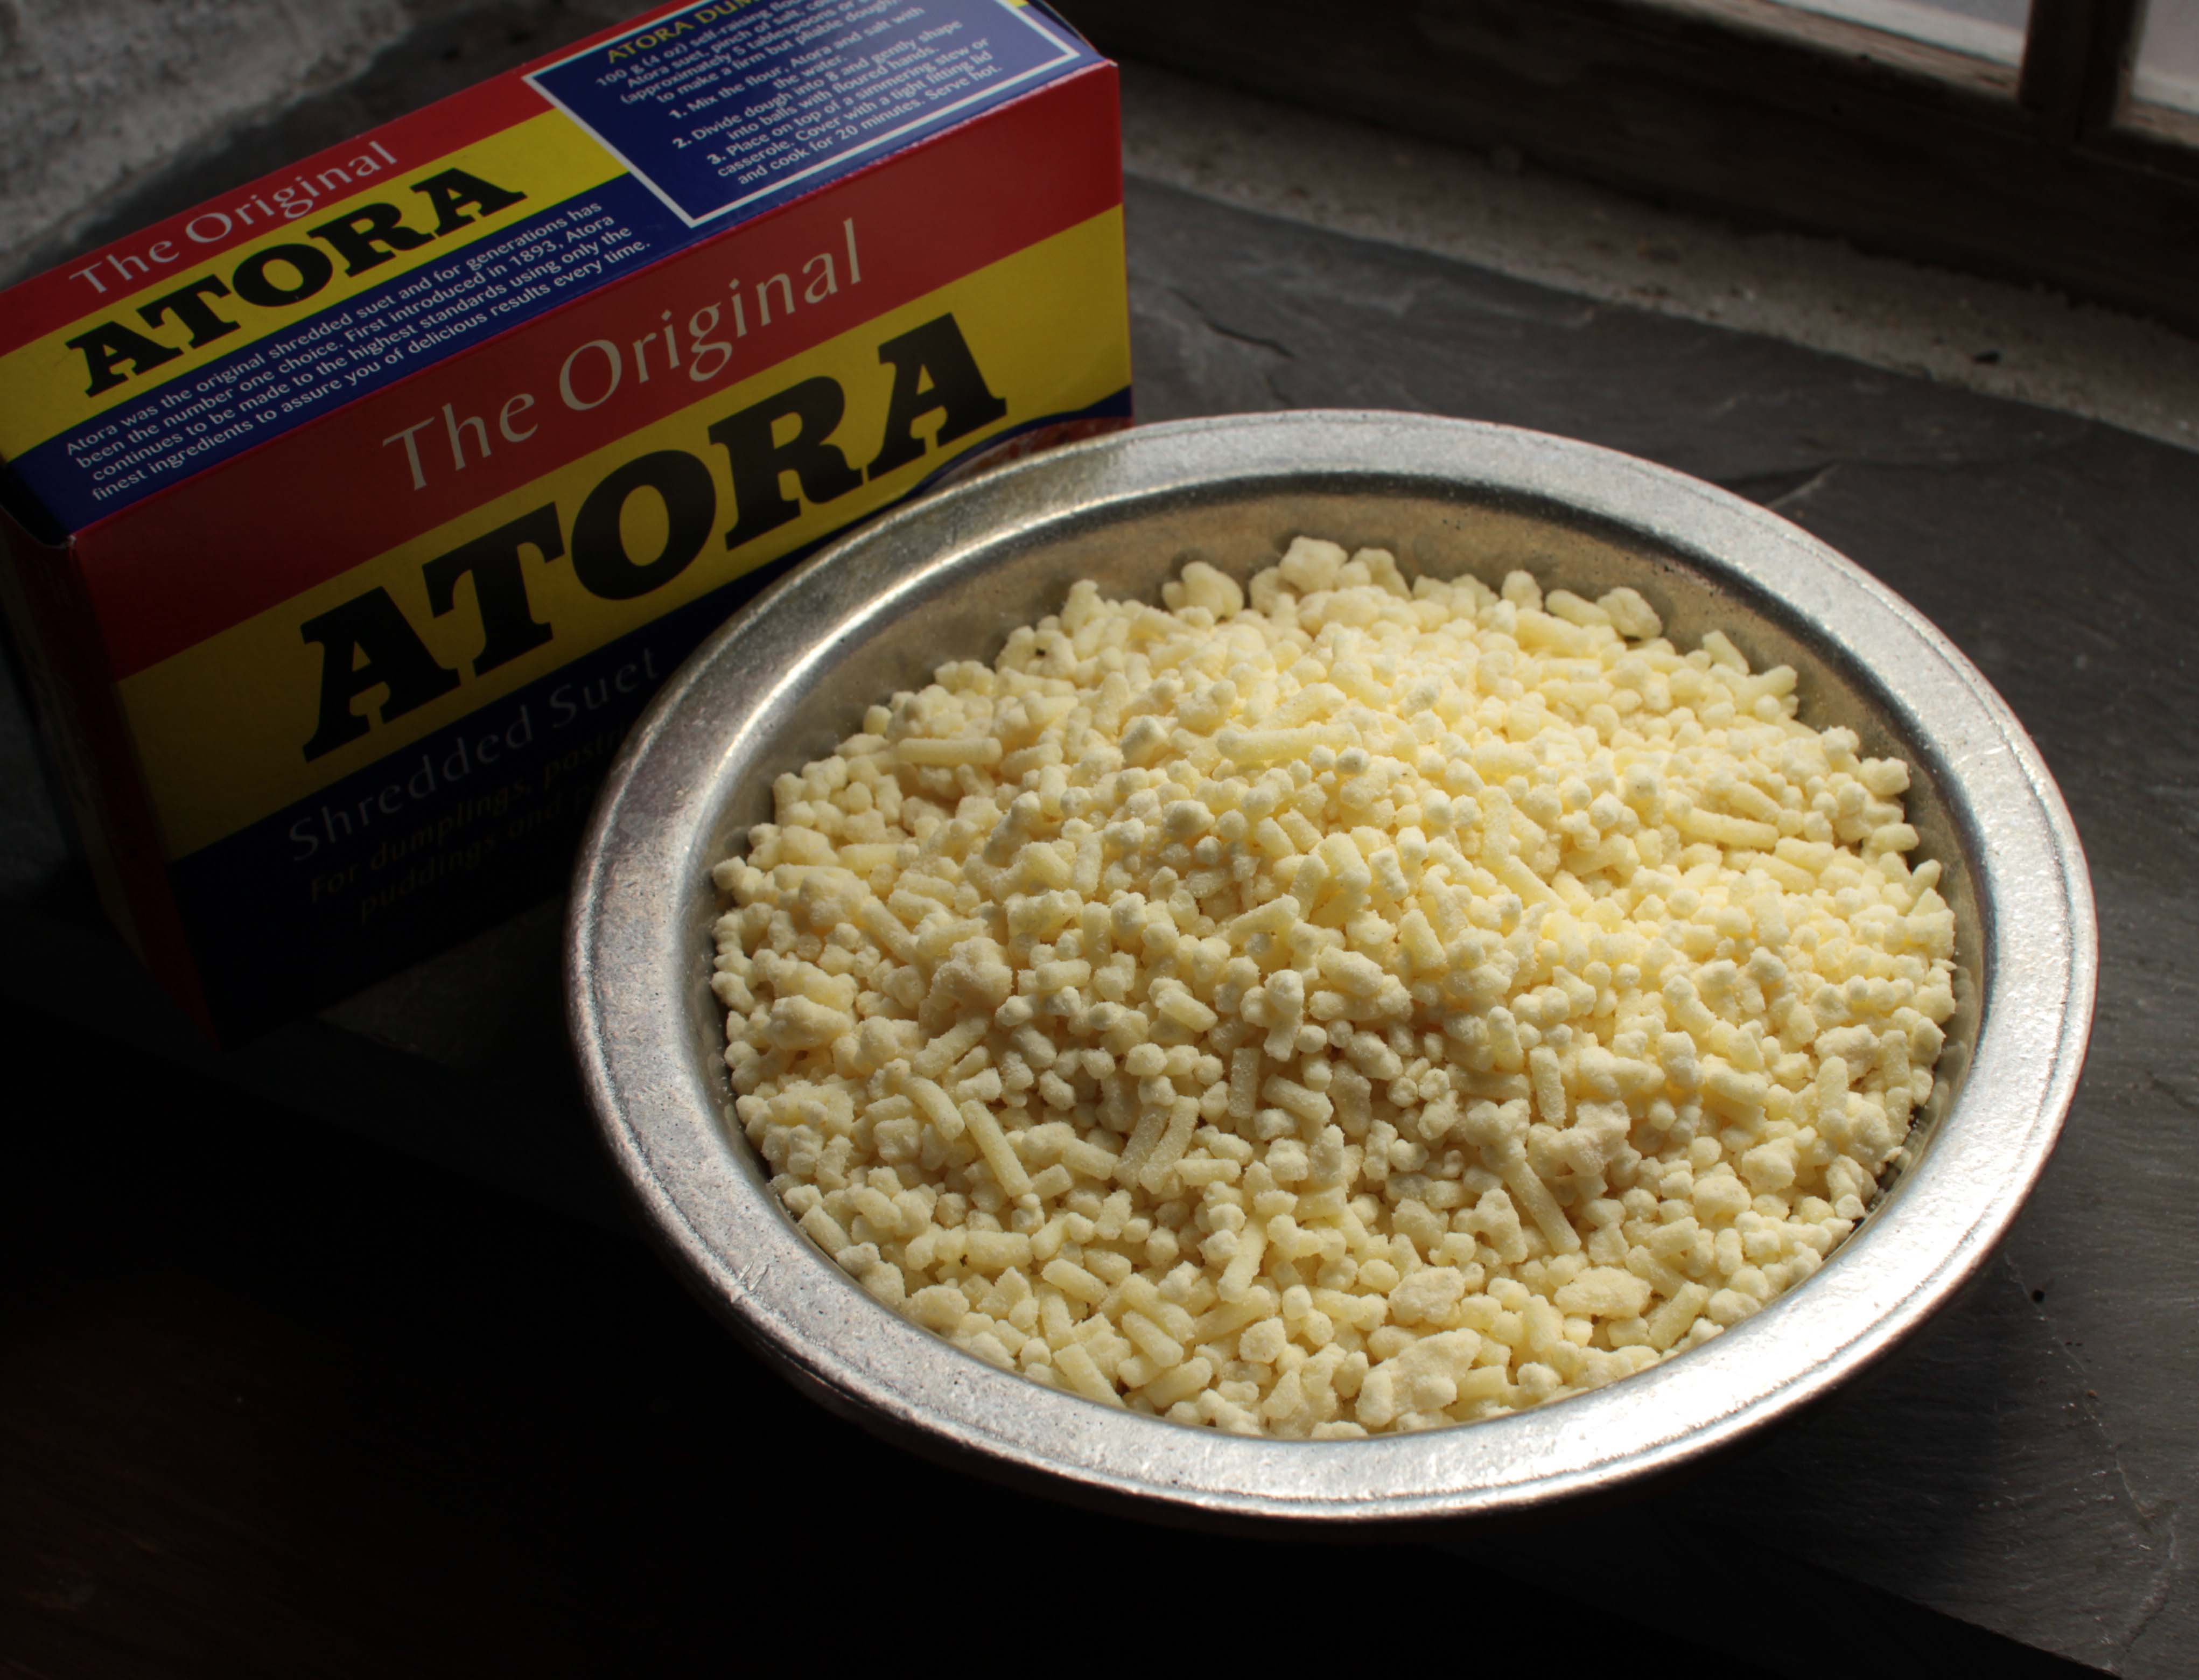
Now, if you live in the U.K., you’re probably wondering why I suggest going through the hassle of dealing with raw suet when all you have to do is stroll down to the corner grocer and pick up a box of processed suet. While I’m sure there are stores here in the States that sell this product, I sure can’t find it here in northern Indiana. We had to go online to buy a box, which ended up going through customs to get here.
If you decide to use this processed product in your 18th century foodie experiments, beware that it uses wheat flour (15% by weight) as a stabilizer to improve its ability to retain its shape. From a historical-accuracy standpoint, the addition of flour may be perfectly legitimate. William Kitchiner, in his 1817 book, “The Cook’s Oracle,” suggests that during hot weather, shredded suet should be dredged with flour — apparently to stabilize its mass retention.
The caveat I offer is that if you are already using flour in your 18th century recipe in addition to that used in processed suet, you may have to make a minor adjustment to the amount of flour in order to get accurate results. Modern recipes that call for suet, by the way, already accommodate this additional flour.
And finally, when shopping for suet, try to get the whitest suet you can find. This little tidbit is reiterated throughout the old cookbooks. Suet tends to turn a buttery yellow as it ages, and as it does, it also takes on a stronger flavor. Most beef offered for sale here in the States is aged. This may pose an additional challenge in finding fresh suet. A processor who actually slaughters the animal is probably your best bet for finding the freshest suet. A light buttery colored yellow suet is still usable, but a clean white suet is preferred. And for goodness sake, don’t accept suet that is brown or massively bloody. That may be fine for the birds, but it’s unsuitable for cooking.
In my next post, I’ll examine more closely how to process suet for use in cooking.
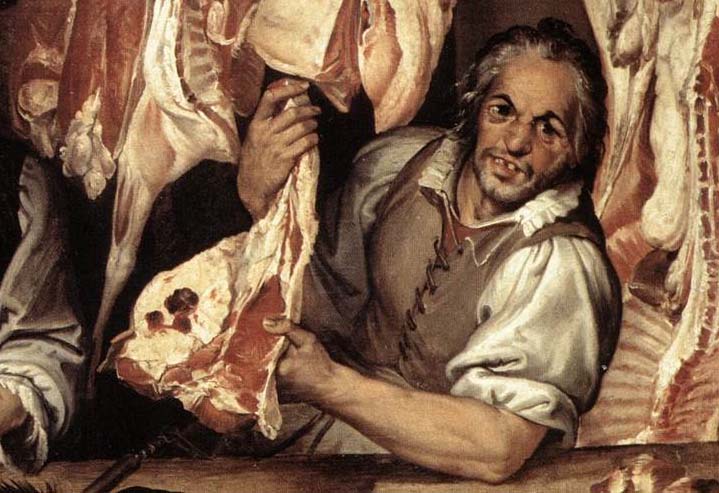
A section of Bartolomeo’s 1585 painting, The Butcher’s Shop. Fresh Suet, anyone?
Scan through almost any 18th century cookbook and you will find a recurring term: Suet. Suet was an important ingredient in English cooking. It’s still used today, though it seems to have reserved its spot on British grocery shelves much more so than here in the United States.
Beef Suet
Suet is a special hard fat found in the loins of beef and sheep — I’ll explain specifically what suet is (and what it isn’t) in my next post. As an ingredient, it fills the columns of the old cookbooks. It’s an essential component in many traditional puddings, dumplings, crusts, mince pie, sausage, haggis, and forcemeats and stuffings. It was used to create an air-tight seal for potted meats and preserved fruits and vegetables. In its clarified state, it was used for deep frying, broiling, basting, and grilling.
David Steel’s 1795 book, “The Ship Master’s Accountant,” explains how sailors were issued flour, currants, and suet one day a week (Sunday, according to other texts) in lieu of their normal ration of beef. With these ingredients, the men would make “Plum Duff” — a simple boiled plum pudding.
Suet had numerous non-culinary uses in the 18th century as well. Countless medicinal ointments used suet as a base ingredient. It was used as lamp oil, as well as in the production of soap and leather treatments such as dubbin and black ball.
Maria Rundell, in her 1807 cookbook, “A New System of Domestic Cookery” uses suet in a couple recipes for Pomatum — the 18th century version of Pomade. She goes on to explain how suet can be used as a rust inhibitor of metal pots and utensils.
Will Hays, in his 1775 book, “Valuable Secrets Concerning Arts and Trade,” publishes a formula which uses suet for oil-based paint. And if you’re ever concerned that someone may find out that you make your candles out of suet, here’s his recipe for a suet candle that no one will ever suspect:
Hays also offers a recipe for fish bait which uses suet and various other sundry (and stinky) ingredients along with a little cotton fiber to hold it all together. More “fish paste” recipes can be found in the 1800 publication, “The Sportsman’s Dictionary.”
Probably the most serendipitous find in my research was Elizabeth Moxon’s instructions for making carbon paper in her 1749 book “English Housewifry.”
Rundell explains further in her book how this black paper can be used to copy clothing patterns.
As I mentioned earlier, I’ll take a closer look in future posts at what Suet is and what it isn’t. In addition, I’ll explain what you should look for when purchasing suet and how to process it for use. I’ll also post a sampling of recipes from various 18th and early 19th century cookbooks that use suet as a major ingredient.
Battle of Grenada, during which Admiral Knowles (Second Baronet) was slightly wounded
I recently received an email from a fellow historical foodie, who…well, for efficiency sake, I’ll include his email message while respecting his privacy:
Good evening,
First I’d like to say that I watch your YouTube historical cooking videos quite avidly, and was most intrigued by the salt pork episode. As a novice naval enthusiast and historian I’m quite interested in the methods westerners–specifically the English and even more specifically the Royal Navy around 1770-1810ish would use to preserve Beef, and also Pork, for long voyages sometimes lasting up to, and even beyond, a year between resupply. These were ships that sailed the seas encompassing Arctic, Temperate, and Tropical seas, sometimes all three in a typical three year voyage, in temperatures that varied even more extremely. My guess is that the process mimics your pork preparation, but involves complete kegging and sealing of the meat after salting and brining. I’m not suggesting you give instructions that if followed could cause harm, I ask purely out of historical interest: How would one go about preserving and keeping salted beef/pork for months during the period of time given above?
Thank you, S.M.
S.M.’s email tickled my memory. While reading through several 18th century cookbooks, I’ve run across a number of recipes that were written specifically for cooks at sea. A few of these cookbooks even have entire chapters dedicated to the sea-faring chef.
Here is an interesting example of such a recipe that addresses S.M.’s email very well. I find this recipe particularly interesting due to its precision and clarity. One item that may need further explanation is the author’s reference to the meat being “hot.” In this case, he suggests the meat be fresh rather than cooked…extremely fresh, that is…as in fresh enough that the meat still retains the animal’s natural body heat.
Admiral Sir Charles Knowles, First Baronet
The recipe reportedly originates from Sir Charles Knowles. It is unclear from the cookbook if this was the father (the First Baronet), who served in the Royal Navy between 1718 and 1779, or the son (the Second Baronet), who likewise served between 1768 and 1831. Given, however, that the son was promoted to the position of Full Admiral in 1810, a full 50 years after his father’s promotion, the recipe is surely that of the father. The cookbook, The London Art of Cookery, written by John Farley, was first published in 1783.
For an explanation, by the way, of the variations of salt, here is an excellent treatise from Charlotte Mason’s cookbook, The Lady’s Assistant, first published in 1775:
In most English societies, for centuries Christmas has been a time of gatherings, and food, and festivities, and traditions, and family. For many people in the eighteenth century, Christmas was celebrated much differently than it typically is today. Remnants of the old holiday customs can still be found in rhyme and song. “The Twelve Days of Christmas,” for instance, is a whimsical 18th century English carol that enumerates the progressive celebrations starting with Christmas day and culminating with Epiphany.
Christmas was Incomplete without Christmas Pie…but Which One?
There were traditional celebrations along with their traditional foods. One such dish was the Christmas pie. Now there were apparently two kinds of Christmas pies known to the English: the Yorkshire pie, and the mince pie.
The Yorkshire pie was nearly always made using a large standing crust. It was filled with a series of progressively larger fowl, boned and wrapped around the smaller fowl. A pigeon, for instance, might be boned and wrapped around a piece of forcemeat or sausage. A game hen would then be boned and wrapped around the pigeon; a chicken, the same, and wrapped around the game hen; a duck around the chicken; a goose around the duck; a turkey around the goose, and then maybe a swan around the turkey. The result would be a grand dish that when sliced would offer a variety of tasty meats spectacularly arranged in concentric circles. The standing-crust pie adorned with a swan’s head and wings in the above David Tenier the Younger’s painting, could very well be a Yorkshire style pie.
The French culinary artist, Grimod de La Reynière, apparently found fame through a recipe in his 1807 book, “Almanach des Gourmands,” that utilized no less than 16 different birds, each boned and wrapped around the smaller: a turkey, a goose, a pheasant, a chicken, a duck, a guinea fowl, a teal, a woodcock, a partridge, a plover, a lapwing, a quail, a thrush, a lark, an ortolan bunting, and a garden warbler.
So, the “turducken” really isn’t all that novel an idea after all.
The other type of Christmas pie that I’m focusing on in this post is the traditional mince pie. Mince pies are thought to have been good English fare since the return of the crusaders. The earliest recipes appear to date back to the 15th and 16th centuries. The earliest versions were strickly meat pies, but by the 18th century, sweeter meatless varieties were well accepted. And by then, both the meaty and meatless versions were tightly associated with Christmas.
From The Lady’s Magazine, 1780
Finding and Duplicating the Perfect Mince Pie
In my research, I found three dozen 18th and early 19th century recipes for mince pie from 24 different sources (before I decided enough was enough). As I compared the recipes, I couldn’t resist musing on the fallacy of accuracy when it comes to interpreting 18th century recipes. I shared my thoughts in an earlier post. The fact is, none of the recipes I found are precise enough to dispel a shadow of a doubt that we have duplicated them exactly. Virtually all of the recipes left one factor or another up to the taste of the cook. I’ll not say any more about that, you can read the post if you wish. I suppose finding that perfect recipe is a fallacy as well, given that so much depends on personal taste.
Observations on the Mince Pie Recipes:
Meat or No Meat?
First things first, regarding the use of meat: two-thirds of the recipes I found included meat as an ingredient, while 1/3 third were meatless. Meats with fine grains were preferred. Ox tongue and beef from the “inside of the sirloin” (what is now referred to as the tenderloin) are choice.
Sweetmeats:
Raisins (left), Currants (right)
Currants were the most frequently mentioned of the sweetmeats over the spectrum of recipes (mentioned 32 times). I’m not talking about the red or black gooseberry cousins with which we like to make jams and jellies. I’m talking about what we Americans call “Zante” currants. This variety of currant is a small dried seedless Corinth grape — a mini-raisin.
Depending on how well your local grocery store shelves are stocked, currants can sometimes be a challenge to find. They can sometimes be found next to the raisins in your grocery store. Other times, they’ll be located next to the fruitcake supplies during the holiday season.
This seedless feature of the Corinth grape was most appreciated by 18th century cooks, I’m sure. Raisins of the 18th century apparently were not like our modern seedless cultivars. They had to be “stoned” before one could use them in cooking — that is, the seeds had to be removed. Stoning four pounds of raisins, for instance, would have been a tedious and sticky job, whereas, the only preparation needed for currants was to make sure they were clear of stems, washed, and well dried.
So if you can’t find currants in your local store, raisins are a suitable seedless substitute. And while you’re looking for currants among the fruitcake supplies, be sure to pick up a few containers of candied orange rind, candied lemon rind, and for you die-hard fruitcake fans, candied citron rind. These sweetmeats were mentioned 23, 12, and 22 times in the recipes, respectively.
A Citron Fruit
In case your wondering, a citron is a bitter, juice-less cousin to our edible citrus fruits.
Fresh Lemon rind was also fairly common, with 16 recipes calling for it.
Sugar:
32 of the 36 recipes used sugar of some kind — either powdered sugar, cone sugar (white sugar), or “wet sugar” (brown sugar). The proportion by which it was used varied tremendously.
Apples:
Apples are our next most common ingredient. Of the 36 recipes, apples were included as ingredients 31 times. A few of the recipes suggested the tartest apples you could find. Others recommended “good baking apples.”
Seasonings:
The two most commonly used spices in the old mince pie recipes were nutmeg and its aril companion, mace — both mentioned 25 times. Ground clove was mentioned 23 times, but it was usually used in lesser quantity than nutmeg or mace. Cinnamon was mentioned in 19 recipes, and when it was, it was often used in greater quantity than nutmeg and mace. Salt was used surprisingly in only 16 of the recipes.
Liquids:
In order of the number of mentions: wine (32 mentions)– either fortified (i.e., sack, port, and “mountain wine”) or unfortified (e.g., white, red, claret or Bordeaux), brandy (27 mentions), Lemon Juice (15 mentions), Orange juice (7), Ver Jus (2).
If you prefer to not use alcohol in your mince pie, one recipe suggested using beef broth, and another, cider. One thing you may wish to consider, however, is that alcohol helped preserve mince. Mince was often made in large batches and stored for months prior to use. Batches of mince that omit alcohol should be used immediately.
Ah, the Secret Ingredient: SUET!
Beef Suet
In all but two of the recipes, suet is listed as a major ingredient. It was the most frequently mentioned of all the other ingredients. Suet is the hard fat found surrounding the kidneys in beef and mutton. It is a milder tasting fat that normal beef and mutton fat, and it has a higher melting point. These two features make it an important factor in many successful English dishes, including mince pie.
Suet adds moisture to the pie. In addition, the higher melting point allows surrounding ingredients to set before the suet melts. This gives the final dish a light and airy texture. This textural effect is even more pronounced in English puddings.
The proportional use of suet varies greatly among the 36 recipes. In the English Art of Cookery (Briggs, 1788), suet accounts for nearly half of the total quantity of ingredients. Most recipes use it in much smaller proportions.
Processed Food-Grade Suet
The problem with suet, however, is that unless you live in Great Britain, or your uncle Harry owns a butcher shop, suet can be really hard to find. If you have managed to endear your local butcher, he or she may be able to reserve suet for you. But even if you do have access to raw suet, preparing it for use can be quite challenging. You can buy pre-shredded food-grade suet on-line from our British friends.
A modern alternative to suet, though admittedly it is inferior to the original, is vegetable shortening. Vegetable shortening has a melting point that falls within the range of that of suet. While it’s flavor is similarly mild to suet, vegetable shortening’s texture, however, is different. Whereas suet can be shredded pretty much at room temperature, vegetable shortening must be frozen first. From experience, if you are going to substitute shortening for suet, I suggest you reduce the amount called for in the recipe by at least half, otherwise, you’ll be pouring off extra melted vegetable shortening from your pie upon removing it from the oven.
Which Crust should be used?
In an earlier post, I explained three basic categories of crusts used in the 18th century: the standing crust, the puff paste, and the short paste. All three are acceptable for mince pies, though a large standing crust or a puff pastry is most often mentioned in the original recipes.
Preparing Mincemeat in Advance
It’s likely that most mince recipes were intended to be made in advance. Specific suggestions are given in a number of the recipes to ensure longer storage life.
Certain ingredients have a tendency to spoil. Some recipes suggest leaving out the apples and suet until the mince is to be used. Others suggest the meat should also be a last-minute addition. There is fairly clear consensus that candied orange rind should be added as needed and not included in the recipe during long-term storage. Orange rind, as opposed to lemon rind, apparently has the tendency to impart over time a bitter taste to the mince.
A basic technique for potting mince for later use is to pack it well into a stoneware pickling jar or storage crock, making sure no air is trapped in the mince. Next, cut a circle from a piece of paper (e.g., writing paper is fine) that will fit nicely over the surface of your mince. Next, pour about a cup of brandy over the paper. This can then be sealed off with a bladder and a piece of paper tied over the mouth of the jar. With proper preparation and storage in a cool place, a number of recipes claimed the mince would keep for six months to a full year. One recipe suggests mince only gets better given a chance to age in storage for a while. If you pot your mince, be sure to mix the pot well before using it, as many of the best flavors will settle in the bottom of the pot.
Not Just for the British
Modern regional traditions suggest mince was a common fare among many American colonists. The early 19th century American cookbook The Virginia Housewife, by Mary Randolph (1838, p. 115) supports this hypothesis.
By the way, the aforementioned Yorkshire Christmas pie can likewise be found in The Carolina Housewife, by Sarah Rutledge (1847, p. 85).
A Selection of Recipes:
In our video, we’ve adapted the meatless recipe below by Elizabeth Raffald, adjusting the amounts to make two 9″ mince pies. We substituted vegetable shortening for suet (and reduced its proportion), and omitted the citron altogether.
I’ve mentioned in an early post that there were, for the most part, three types of pastry crusts used in 18th century cooking. This is admittedly a simplification of the goings-on of the old English kitchen. There were other types of crusts, but the three most commonly used in recipes were the standing crust, the puff paste, and the short paste. Of these three, the short paste, also known as the common paste, was the most recent development in 18th century pastry.
The short paste is a light and flaky pastry — both the ancestor and equivalent to our modern pie crust. It consists of flour, fat, and just enough water to hold it together. Salt was sometimes tossed in, sometimes sugar. Contrary to the tough standing paste which relied on boiling water and butter to be study enough to be used as baking dish, serving dish, and storage dish alike, a short paste’s light and flaky (and very edible) success relies on the ingredients being cold.
Now I refuse to step here into the modern war of words pertaining to which is best to use in a pie crust: butter, lard, vegetable shortening, or some combination thereof. In every case that I am aware, 18th century recipes called for the use of butter. So that’s what we’re “sticking” with. [Sorry. I couldn’t resist.]
Here’s a typical recipe for short paste. You can see this recipe demonstrated in our video below. This recipe is perfect for a single crust for a 8″ to 9″ pan (and you can possibly squeeze a second crust out of it if you recycle your scraps), or it will be more than adequate to cover a 5″ tart tin, both top and bottom.
A Short Paste Recipe
Ingredients:
2 cups Flour (All Purpose will do)
12 Tablespoons Butter, chilled
3 -5 Tablespoons Cold Water
Also:
Additional Butter for the Baking Tin
Directions:
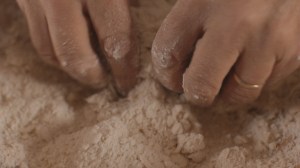
Cut your butter into pieces and combine it with the flour in a large bowl. If you’re working at home, you can use a pastry cutter or a food processor, otherwise use a large spoon to press the butter into the flour, or use your fingertips to squeeze it in. If you use your fingers, try to avoid being in contact with the butter any longer than is absolutely necessary. You want to work the flour and butter together without melting the butter, and even the temperature of your hands can melt it.
When you’re done, the mixture should look mealy like corn flour.
Next add just enough water to bring the dough together.
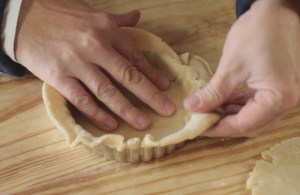
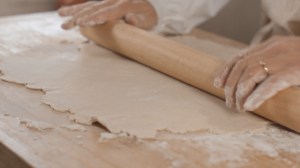
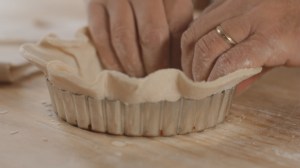
Gather your dough, and roll it out on a well-floured surface with a well-floured rolling pin, rotating the dough to keep it from sticking to the work surface. Roll it out until it’s about 1/8″ thick.
Cut out two circles, about 2″ to 3″ wider in diameter than the pan you intend to use.
Press the dough into a well-buttered tin, making sure it is pressed well into the corners. Trim off any excess dough.
And now for the filling…
Here’s a delicious recipe from Hannah Glasse in her 1760 cookbook, “The Compleat Confectioner.” Similar recipes are offered in numerous other period cookbooks.
Here is a bit more precise take on Glasse’s recipe, good for our 5″ tart tin:
Pear Tart
Ingredients:
2 Ripe Bosc Pears, pared, corred, and cut into pieces
4 Tablespoons Powdered Sugar, divided
1 strip of Lemon Rind, about 3″ long
1 teaspoon fresh Lemon Juice
Directions:
You can bake your empty bottom crust in a medium oven, 400-degrees (F), for 5 to 10 minutes if you wish (but you don’t have to). Doing so will ensure the bottom crust is completely baked.
Sprinkle 2 Tablespoons of powdered sugar into your empty pastry crust (after baking it if you so choose to do so) and set it aside.
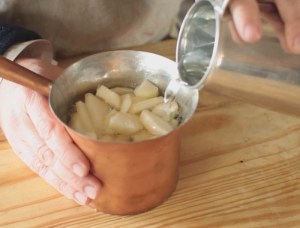
Place your chopped pears into a sauce pan and pour in just enough water to cover. Set this over a low fire and simmer until the pears are very soft.
Once the pears are soft, drain the pears, reserving the liquid. Allow the pears to cool slightly before filling your pie crust with pear pieces.
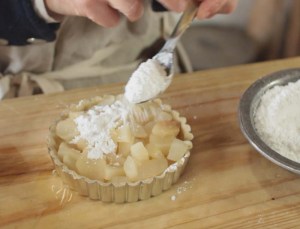
Sprinkle an additional 2 Tablespoons powdered sugar on top of the pears.
Drizzle a Tablespoon of the pear liquid on top of the pears, along with a squeeze of juice from half a lemon.
Cover the pie with a top crust, trim away any excess paste, and cut a few vents in the top. Bake in a 400-degree oven for about 20 to 30 minutes, or until golden.
Optional toppings for your tart:
There are a number of period-correct ways of topping your tart. The tart at the top of the page was brushed with a wash of beaten egg whites and then sprinkled with sugar. Maria Rundell suggests this general approach to tarts in her book, A New System of Domestic Cookery (1807, page 165).
Another approach is to bake the pie until it’s done, bring it out of the oven to cool slightly, then top with a meringue of egg whites and sugar. You will want to then pop it back into the oven (250 – 300-degrees) until the meringue sets, but preferably does not brown. Topping double-crusted tarts with meringue or chiffon was apparently a common practice, as that technique was mentioned in numerous period cookbooks. Here’s such a recipe from Mrs. Frazer’s book, “The Practice of Cookery,” (1791, page 205).
There is debate about the timing of the meringue’s application. Other cookbooks frown upon a meringue that is browned. In order to achieve a white meringue and an adequately baked pie, the pie must be baked first and then baked again with the meringue.
A Third way of topping your tart is with what Mrs. Frazer refers to as a “liaison” or a custard. Farley recommends this topping as well in his book “The London Art of Cookery,” (1783, page 209) The following recipe for “a Plain Custard” can be found in his book on page 317:
I recently completely a side-by-side comparison of a number of 18th and early 19th century recipes for mince pie — 36 recipes in all from 24 different sources. I have to admit that when I get involved in something like this, a certain compulsiveness to be thorough and precise takes over that likely exceeds the value of the outcome. The law of diminishing returns has something to do with that, I’m sure.
[As a side note, contrary to a common opinion, our modern super-sweet meatless mince pies are not necessarily an evolutionary destination of the original heartier mincemeat pies (which contained REAL meat like tongue and tripe). One third of the recipes I collected were for a meatless variety.]
Any way, while noting differences among these recipes, I couldn’t help but notice the distinctions not only in ingredients, but also in approaches by the authors.
I like precision in recipes. I believe I’ve mentioned in other posts that I’m a big fan of celebrity chef, Alton Brown. Confession time. Just like him, I have my little battery-powered kitchen scale out on the counter next to the Kitchenmaid stand mixer. I prefer to weigh my flour instead of scoop it. Precision helps accomplish consistency. I like consistency, especially when it’s a really delicious recipe at stake.
So I’m doing the research on 18th century mince pies for an upcoming Christmas video. I figure I’ll do the hearty version of the mince pie, consisting primarily of neat’s (ox) tongue, kidney suet, sweetmeats (various dried and candied fruits, e.g., raisins, currants, and candied citrus rind, and a mix of salt, nutmeg, cinnamon, mace, and cloves. But the moment I start reading the recipes, I hit a wall. I’m wanting to accurately replicate an original recipe, but none of the recipes are precise.
Take, for instance, how over half the recipes instruct the cook to “take one neat’s tongue…” There’s no indication of what the average neat’s tongue weighs. It’s my understanding that, depending on the breed of bovine, a modern “lingua” can weigh any where between 2-1/2 to 9 pounds. The tongues I purchased from my local Latino market each weighed around 3-1/2 pounds. By comparing the proportions of other ingredients listed in other recipes — especially those recipes that DID give precise weights, 3 to 4 pounds of neat’s tongue seems to be in the ball park.
Elizabeth Cleland’s method in “The New and Easy Method of Cookery” (1759, page 81) seems to address this concern. She prescribes using a proportion system. Weigh the neat’s tongue after it has been cooked and prepared, then add twice as much suet and twice as much sweetmeats. But beyond that, when it comes to seasonings and other adjuncts, even she resorts to “some of this” and “a little of that.”
On the opposite end of the spectrum, you’ll find Mrs. MacIver and her book, “Cookery and Pastry” (1773, page 111). Her approach is to offer a mere suggestion.
Huh?
My O.C.D. is kickin’ in big time.
“So use another recipe,” you suggest.
But it’s not that simple! Let’s go back to Cleland. She suggests using a “Mutchkin” of brandy. The O.E.D. defines muntchkin as 1/4 part the old Scots pint, or 3/4 an imperial pint.
Huh?
Then I note some of the other measurement terms I ran across in my research: “a glass,” “spoonful,” “a large spoonful,” “a teacup,” and of course, “some” and “a little.” How can one be absolutely sure about what they were talking about? “A large spoon” could be referring to the large wood ladle that grandma always used to measure flour. Come on! I need precision! People are going to ask if the recipe I use in the upcoming video is an accurate replication or if it’s a modern adaptation.
The problem, however, that makes accuracy impossible (and yes, I said IMPOSSIBLE), is that there were no standard measures in the 18th century. Sure, there was the old English unit system. Wikipedia has a good (albeit, by the nature of the beast, confusing) explanation.
A “mouthful” equals 1/2 fluid oz. A “pony” equals 1 oz. A “Jack” equals 2.5 oz. A “Gill” (pronounced “Jill”) equals two Jacks. A “cup” equals two gills, or 10 oz (as opposed to our 8 oz). A “quart” equals four 10-oz cups. A “pottle” equals two quarts. A “gallon” equals two pottles.
But hold on. A gallon? If you’re going to base your interpretation of measures on the gallon, is that a “Corn Gallon,” “Wine Gallon,” or “Ale Gallon”? They’re each different, and all three were used in the 18th century.
Can you see how quickly this is spinning out of control?
Believe me, I’m not hiding behind a smokescreen of fallacious confusion in order to create an excuse for mediocre research and lazy interpretation. The fact is, none of the recipes were precise. Even the most precise 18th century recipes used obsolete measuring techniques and left much to the final say up to the cook. How can one be precise in his or her interpretation, when the original recipe wasn’t precise?
This presents a problem to the food archaeologist or historical foodie who desires to uncover the distinctions between the 18th palate and our own. I have yet to see an exception where an original 18th century recipe did not count on the personal taste of the intended cook. “Some of this” and “a little of that” is the same as Alton Brown saying “season to taste.” That is the true dilemma.
And when it comes to trying to be as accurate as possible in replicating original recipes, I haven’t even begun to address potential differences between period ingredients and their mutant descendants. Author and food historian Karen Hess had much to say on this topic in her annotations on “Martha Washington’s Book of Cookery.”
So it seems the challenge is not a matter of exact replication, but rather, how close can replication be practically achieved. I’d venture to say that a modern adaption of a recipe based on thorough comparative research may have a higher historical value than trying to replicate an old apple pie recipe using oranges.
Wow. I feel I have one foot on the soap box. I think I’ll step away now before a crowd begins to gather.
My thoughts here should be construed as neither criticism nor a personal defense. I have neither motive in mind. These are simply the thoughts and observations of a man who has just studied three dozen mince pie recipes…just in time for Christmas.
It could be worse, I suppose. They could have been recipes for fruitcake.
By the way, I’m sure there will be at least one more post pertaining to mince pies.
Here’s an interesting cookbook by Frederick Nutt, originally written in 1789, called “The Complete Confectioner, or the Whole Art of Confectionery.” Just in time for the holidays, its repertoire of recipes includes biscuits, drops, prawlings, ice creams, water ices, fruits preserved in brandy, preserved sweetmeats, dried fruits, and cordials.
In her 1807 book “A New System of Domestic Cookery; Formed upon Principles of Economy, and Adapted to the use of Private Families,” Maria Eliza Ketelby Rundell offers wonderfully helpful advice to the novice baker, especially when it comes to baking cakes.
Throughout the 18th and early 19th centuries, the word “cake” was used to describe what we would presently call both cakes and cookies. Mrs. Rundell’s counsel pertained to the baking of large cakes.
First a little science:
While modern cake recipes primarily utilize chemical leavening agents, i.e., baking powder and baking soda, early cake recipes depended on either biological or mechanical leavening. Leavening is the process of infusing gas into a dough or batter, causing it to rise, resulting in a lighter, airier finished product.
The aforementioned baking soda (and its antediluvian cousins, pearlash and saleratus) requires acids to be present in the dough or batter in order to work. Remember the childhood science experiment involving baking soda (alkaline) with vinegar (acid)? Foamy. Baking powder, simply put, is that same science experiment but in powder form. It becomes reactive when introduced to the moisture in the batter or dough.
Biological leavening is accomplished primarily through yeast, but also through bacteria. Yeast is a microscopic fungus that feeds on sugars and as a result secretes alcohol and carbon dioxide. While people knew of the leavening properties of yeast for centuries (if not for millennia), no one really knew what yeast actually was or how it worked until Louis Pasteur started poking around.
Mechanical leavening is different altogether. Its primary catalyst is called “cubito Deturpant” — that’s Latin for “elbow grease.” With a little elbow grease, for instance, whisk some egg whites and voila! Chiffon! (Add sugar and you’ll have meringue.)
Many 18th and early 19th century cake recipes use this technique for leavening. Eggs were separated, then the whites were whisked into chiffon while the yolks were often mixed separately with other ingredients before being reunited in a cake pan. The recipes’ success depended in part to how well the air was trapped in the egg whites.
Here’s a recipe from Mrs. Rundell’s book that demonstrates this technique:
But firm peaks didn’t guarantee a light and fluffy cake. Oven temperature was also a critical factor to success.
Now keep in mind that we’re not talking about a modern thermostatically controlled oven here. When this recipe was written, the oven was likely a brick or earthen oven heated by a wood fire. Depending on the size and construction of the oven, it could have taken an hour or more to reach proper temperature.
By the way, wood-fired ovens are really remarkable devices. If you’ve never had a pizza made in a flaming 700-degree wood-fired oven, in my opinion, it’s worth the time to watch our video on how to make an oven as well as the effort to build one yourself.
Baking a loaf of bread, or a cake, or a pie, for instance, in a brick or earthen oven requires a little more delicate touch. The oven is emptied of its embers with a rooker, the floor is swabbed clean of ash with a malkin, and temperatures need to be hot enough to cause rapid steam production in the batter (which in turn inflates the tiny air pockets trapped in the chiffon), but not too high so that the cake burns. But if the oven isn’t hot enough, the cake will be heavy.
Furthermore, there needs to be enough heat stored in the walls and floor of the oven to radiate the entire baking time, so that the developing crumb or sponge structure of the cake can “soak” or set.
(Come to think of it, I take for granted the conveniences of modern “kitchenry.”)
Mrs. Rundell’s book addresses this precarious aspect of baking cakes in a wood-fired oven:
It’s critical that the oven conditions are right to get both a rapid rise as well as a set crumb structure. Mrs. Rundell suggests a quick poke with a clean shiny knife to see if the cake is done. If any of the cake sticks to the knife, the baker shouldn’t dillydally, but should return the cake to the oven immediately.
Cakes were expensive back then. Their ingredients were expensive. And making them was tedious and even grueling. They weren’t as simple as “combine 1/3 cup oil, one egg, and the contents of this box.”
But if the investment in ingredients and labor combined with the uncertainty of wood-fired confectionery wasn’t a big-enough concern for the 18th and 19th century baker, consider Mrs. Rundell’s final and rather ominous caveat to those who dare try their hand at baking a cake:
Wow. Talk about pressure — especially in this economy.
Our third video series, “18th Century Cooking with Jas. Townsend & Son,” is embarking on a closer look at the three more common types of pastry crusts used in 18th century cookery: the standing crust, the puff paste, and the short crust (also known as the common paste or cold paste). Pastry crusts were foundational to a great many 18th century dishes. Our second video installment (above) focuses on the puff paste. I am also including an 18th century recipe for beef pasties at the end of this post.
Puff pastry was a very popular form of pastry crust in the 18th century. It was commonly used for pies, pasties, and fried patties (what we would think of as a fried turnover). A number of period cookbooks suggest puff pastry is best for meat dishes, though others also recommend a thin puff paste for fruit tarts. According to the Oxford English Dictionary, recipes for puff pastry first began to appear in cookbooks in the early 1600’s.
The basic ingredients for puff paste are virtually the same as those used in standing and short crusts: flour, water, a little salt, and fat, but the key to making a good puff paste is found in how one goes about bringing the ingredients together. Rather than incorporating the fat (i.e., butter) into the flour by cutting or rubbing it in as with a short crust, or by melting it before mixing as with a standing crust, the butter used in a puff paste is for the most part sandwiched in between layers of dough. The butter/dough sandwich is then repeatedly rolled out thin and folded upon itself. During this whole procedure, the dough and butter are kept chilled to prevent the butter from melting and thus becoming completely integrated. The layering of butter between thin sheets of dough results in an exquisitely flaky crust unequaled by other construction methods.
For our recipe, we are using a 1:1 ratio of flour to fat: one pound of pastry flour and one pound of butter. We have chosen pastry flour because of its low protein content which makes it easier to roll out. We are also using egg whites instead of water. Egg whites result in a dough that is easier to roll out, but it will also result in a finished product that has a crisper, crackly texture.
A Puff Paste Recipe:
Ingredients:
1 lb. (about 3-1/2 cups) Pastry or Cake Flour
about 1 teaspoon Salt
around 1 cup egg whites (or water)
1 lb. Unsalted Butter
Directions:
To make a foundational dough, mix the first three ingredients. If the dough is too sticky, add additional flour, a little at a time. The dough should be soft and easy to work. Knead the dough on a well-floured surface for about 10 minutes. Cover your dough and set it aside while you work on the next step.
Next, lay out four sticks of butter side-by-side on a piece of cloth or plastic wrap. Cover the butter with the same and press it with a rolling pin into a single patty of butter about 1/2″ thick. Don’t be afraid to show your butter who’s the boss.
Once you’ve reached the desired thickness, set your butter aside, keeping it as cold as possible.
Next, roll out your dough into a large square, until it’s about 1/8″ thick — maybe just a bit more.
Place your pad of butter in the center of your square and fold the dough snugly around the butter like an envelope.
Roll the pastry into a long rectangle about 18″ long by 8″ wide by about 1/4″ thick.
Fold the dough onto itself in thirds.
Turn 90-degrees, and roll out to 1/4″ thick once more. Fold into thirds again, cover with a cloth, and allow your dough to rest for 5 to 10 minutes in a cool place (e.g., your refrigerator).
Repeat this process three more times, allowing your dough to rest each time.
Once you’ve done this folding and rolling process a total of four times, it’s time to roll the dough out one last time to the final thickness you wish to use it.
This dough can be quite stiff and stubborn to work with. It has a tendency when rolled out to shrink right back to a smaller thicker shape. This is the case even when using cake flour, but it is even more of a battle if you opt for all-purpose flour.
AH! But here’s a little secret technique that you won’t even see in the video!
During the filming of the above video, Jon and I took a break right at this point in the process. Jon left the set to tend to a few other business matters. I told him I would roll the dough out to the final thickness. I had done this a number of times before, struggling each time with the dough’s elasticity. I would work up a sweat rolling the dough out to the perfect thickness only to have it spring back out of protest to a smaller and thicker size.
I had read a number of period recipes that prescribed “beating the dough well.” Up to this point, I figured that was an 18th century euphemism for “rolling it out.” My assumption was based on other such unfamiliar terms used in the old recipes. Take, for instance, the phrase, “cast the eggs until they are light.” “Cast” means to whip. So “beat” probably means to roll out, right?
Wrong.
“Beat” means to beat. I discovered this through my frustration. A rolling pin is the weapon of choice. I normally don’t condone this type of behavior — especially in the kitchen, but if you stay focused on the dough, trust me, it will be o.k.
So as you roll out your dough to its final thickness, if it resists and shrinks back to a smaller size, whack it a few times with your rolling pin. Start with a few gentle whacks at first, until you get a feel for how much the dough can handle. Try it. I think you’ll be surprised at how persuasive this technique is. And you may ashamedly find it to be a little therapeutic.
Once you have rolled out your dough to its final thickness, you’re ready to cut it to size. It can be used to line pie pans or to top them. You can cut out a circle of the dough, pile on some seasoned meat, and seal the edges by brushing them with egg and crimping them over. Baked or fried, the possibilities are nearly endless.
A Recipe for Beef Pasties (pronounced “PAST-eez”)
At the risk of stepping into a very old culinary fray, the quintessential English beef pasty is probably better known as the Cornish pasty. the modern Cornish pasty is a heritage food protected by British law. By definition, it contains chopped beef, potatoes, onions, and “swede” (otherwise known as yellow turnips or rutabaga).
Our recipe, on the other hand, is an authentic 18th century version that uses only seasoned beef.
Pasties are thought by many to have originated as a food for the upper class, since the earliest recipes called exclusively for venison. By the end of the 18th century, however, other meats, e.g., beef and mutton, were used as a substitute to venison, and the convenient meal-on-the-go made its way into the grimy hands of field workers and miners.
Ingredients:
puff pastry
1-1/2 lb. Beef, coarsely chopped
1/2 teaspoon each, Salt and Pepper
2 Tablespoons Butter, divided
1 Egg White, beaten, for the egg wash
Directions:
Your puff pastry should be rolled out to less than 1/4″ thick. Cut out two circles approximately 9″ in diameter. Set aside.
Season the chopped beef with salt and pepper, and divide into two equal portions. Spoon the meat onto the middle of each puff pastry round and dab it with a little butter. brush the edges of each round with egg wash and fold the round in half. Seal the edges by folding them over, pinching them as you go.
Brush each pasty with egg wash. Cut a couple of vent holes through the pastry dough. Place each pasty on a paper-lined baking sheet, and bake at 350-degrees (F) for one hour, or until golden brown.


 After several hours after the fat is completely liquefied, stain it through a sieve or a clean cloth.
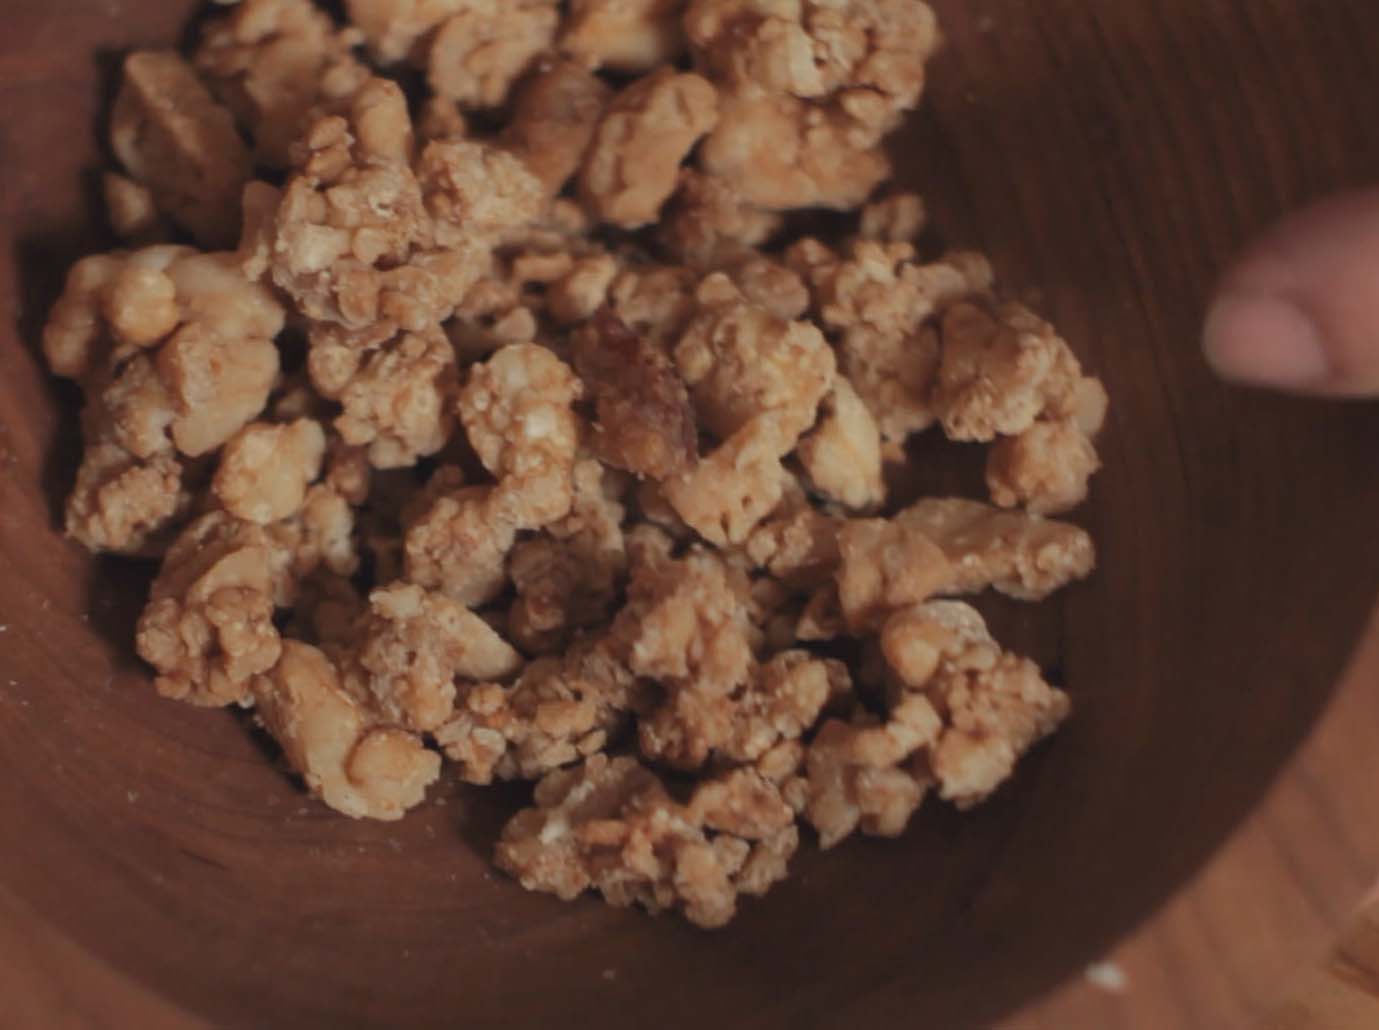
 Once you’ve strained the molten suet free of graves into a bowl, transfer the suet into pans for cooling. Rundell suggests pouring the suet into cold water. This further refines the suet by settling out any particles. Some modern rendering techniques suggest a secondary rendering as well to ensure that the moisture is completely driven off.
 When the suet has solidified, it can be removed from your molds, wrapped in paper, and then placed in a cloth bag for storage in a cool dry place.