This recipe is a date turnover from a 1596 cookbook called “The Good Housewife’s Jewel” called Tiny Purses.
2 cups Dates stoned
1 cup Raisins or Currants
1 tbsp. Suet or Coconut Oil
1 tsp. Ginger
1 tsp. Cinnamon
2 tsps. Sugar
Puff Paste
Mix together your dates, raisins, suet, ginger, cinnamon, and sugar in a bowl. Cut puff paste into about 5 inch squares.
Lay down your paste and place a flattened portion of the filling inside. Make sure it’s a decent size and flattened. Moisten two of the edges of the puff paste and fold it into a triangle then pinch the edges shut.
Bake at about 350 degrees until golden brown.
Transcription of Video:
Today we are going to make a recipe called tiny purses. Thanks for joining us today on 18th Century Cooking.
This recipe comes from a 1596 cookbook called “The Good Housewife’s Jewel”. This recipe, although it’s called little purses, is really a date turnover. The first thing we have to do is stone these dates. I’ve got about 2 cupfuls of dates here.
Whoo, this is sticky! Although if you want to save time, you can buy your dates prestoned. Now that we stoned our dates, let’s mix our ingredients. First we need our dates, then we need a cupful of small raisins. I’m using zante currants. The recipe calls for marrow. I’m going to use a tablespoon of suet instead. A good substitute might be coconut oil. We’re also going to season it with a teaspoon of ginger, a teaspoon of cinnamon, and two teaspoons of sugar. Now that we’ve got all the ingredients, let’s mix it into the bowl.
Whoo, this is really sticky stuff! You’ve really got to dig into this!
Now that our mixture’s ready, let’s put them in the shells. The shells are going to be puff paste cut into about 5 inch squares. If you’re interested in making your own puff paste, I’ll put a link down below. Lay down your paste and put a flattened portion of the filling. Make sure it’s decent sized and flattened. Moisten two of the edges and fold it into a triangle. Make sure to pinch the edges.
These are ready to bake at about 350 degrees. I’m not sure how long these take but I’ll watch them till they’re golden brown.
These smell great. So good in fact, that I asked my dad to come and taste test with me.
[Jon] Well, they do smell great. I could smell them in the oven and wow, they filled the house up with a wonderful smell, so are we going to try them out? I think they’re cool enough, so let’s give them a try. You pick one. I’ll take this one. They look beautiful too. They could even have icing on them, but I think that would be too much. Mmm, that is a wonderful flavor and I really wasn’t expecting that. I ate a few of the dates that she had raw and the dates were actually, obviously, very good, but with the spices.
[Ivy] They taste wonderful.
[Jon] Right with that ginger and the cinnamon in there with the dates and the raisins or the currants, it’s got an amazing flavor that I really wasn’t expecting and a wonderful aroma.
[Ivy] Yes.
[Jon] You did an excellent job on these. They look kind of really hard to smoosh up.
[Ivy] They are.
[Jon] Yeah, it’s a very sticky, the dates and everything, getting that all together, but Ivy did a great job. Thank you for bringing us this recipe. It was wonderful. If you get a chance, this one, again, it’s simple, really not that many ingredients, and all these things you can find at the grocery store so you should be able to do these easily. So thank you so much Ivy and I want to thank you for coming along and savoring the flavors and the aromas
[together] of the 18th century.
If you’re new to our channel, I want to welcome you. You can subscribe by clicking the button right up here. Also, check out our related videos. Thanks so much for watching.
This recipe for Barley Gruel comes from John Knots 1724 cookbook called “The Cooks and Confectioners Dictionary”.
3 oz. Barley
1 qt. Water
4 oz. Currants or Raisins
3 Egg Yolks
10 oz. Cream
1 cup White Wine or Sparkling Grape Juice
Lemon Zest (about half a lemon peel)
Sugar
Boil the barley in 1 quart of water changing the water out as needed until it comes out clean. Add in currants and allow to boil for about an hour then remove from heat and allow to cool.
Mix together egg yolks, cream, white wine, and lemon zest. Make sure that your barley is cool enough that it will not cook your eggs, then add to your egg mixture.
Place your gruel into a pot and heat on low stirring constantly until the mixture starts to thicken. Remove from heat, allow to cool and sweeten to taste.
Transcript of Video:
So, today’s recipe sounds horrible, barley gruel, but let’s find out. Thanks for joining us today on 18th Century Cooking with Jas. Townsend and Son.
The recipe for today comes from John Knots 1724 cookbook called “The Cooks and Confectioners Dictionary” and you know, it starts off with something pretty simple, he wants us to make barley water with 3 ounces of barley and a quart of water so I’m going to put this quart of water on to boil and then we’re going to add in our 3 ounces of barley. He also talks about making sure that our barley is white and if your barley is like my barley, you’ll start boiling it and you’ll get this kind of scum that comes up to the surface and you’ll want to skim that and you’ll get maybe sort of a brown barley water out of it and what he wants is the nice cleaner water so he talks about shifting the water once or twice so once it’s come up to the boil and some of the scum has come up to the surface, we’re going to drain this off and put more water back in, again about a quart. We don’t want to put in too much more, and let this boil. As it’s boiling we can add in our currants. He asks for about 4 ounces of currants in this situation. You could use raisins instead, really the currants aren’t the important part of this, so a little less or a little more really isn’t’ that important.
To get your barley nice and tender, you should boil it about an hour. So our barley is basically done. It’s ready to go. We need to let this cool and we’re going to start making this other mixture that we’re going to add into it, so let me set this aside to cool and now let’s work on our other mixture.
We need 3 egg yolks. He calls for a half a pint, it may actually be 10 ounces, of cream. Also, some white wine, the same amount, also about a cup. Also some lemon zest, it’s about a half a lemon peel that I zested up. Now our mixture is stirred up, I’ve got our gruel, I’m going to go ahead, for the sake of mixing it up, I’m going to put it into the mixing bowl, but we’re going to need to heat this up, so we’ll put it back into a vessel we can heat with. You want to make sure that this is cool enough though that it doesn’t cook our eggs as we add this in, and you can tell by this time that the barley should have absorbed a lot of that water. It’s not nearly as liquidy as it was in the beginning. Now that this is mixed up, we can put it back in our vessel here. We’re going to put it on a low heat and make sure to stir it constantly until it starts to thicken.
I’ve let this cool a little bit. The recipe says to sweeten to taste so I’m just going to add a little bit of sugar here and mix it in and hopefully it’s cool enough that I can try it out.
Mmm, whoa, that’s the best gruel I have ever had. This is really good. All the flavors are there. You get a little bit of the wine flavor up on top. If you want to use just a sparkling grape juice you can get the same kind of flavors here that the wine’s going to give you, at least a little bit, if you don’t want to use an alcohol, but you get all these different flavors coming in that we had with the little bit of spices, that lemon in there, the sweetness also, the thickness of this custard is wonderful and those little textures of the barley in there. They’ve been cooked so long that they’re very soft, just like a tapioca would be and tapioca wasn’t in the 18th century, at least in an English context, so this is probably as close as you’re ever going to get to a tapioca pudding in the 18th century. Wonderful. If you get a chance to make up this barley gruel, you will enjoy it, I promise you. I want to thank you for coming along as we’re experimenting, as we’re savoring the flavors and the aromas of the 18th century.
If you’re new to our channel, I want to welcome you. You can subscribe by clicking the button right up here. Also check out our related videos. Thanks so much for watching.
Today Michael Dragoo is helping us with an Oxford Kate sausage recipe from Martha Washington’s cookbook. Martha Washington believes this should have been called Oxford Gate sausages after a tavern located near the north gate in Oxford but may have been misnamed.
1lb Ham
1lb Veal
½lb Suet
1 Egg Yolk
Salt
Pepper
Mace
Sage
Cloves
Simply mix the ingredients together well using the egg yolk as a binder. Add the spices in to taste.
The recipe originally calls for an entire leg of ham and was 12 pounds of meat, so you can really make as much as you want. Once thoroughly mixed, roll the meat out into the thickness of a finger, about the size of a breakfast sausage. Melt some suet in a hot pan and gently fry the sausages until completely cooked.
[Jon] Hi, I’m Jon Townsend and with me today is Michael Dragoo and we’re making
[Michael] Oxford Kates sausages.
[Jon] Thanks for joining us today on 18th Century Cooking.
[Jon] So Oxford Kates sausage? Explain that.
[Michael] Well, this is from the Martha Washington cookbook and Oxford Kate, she thinks, should have been Oxford Gate. Oxford, the town, had a surrounding walls and a gate and there was a tavern at the north gate.
[Jon] Okay
[Michael] Oxford Gate.
[Jon] So it’s famous for that.
[Michael] Oxford Gates sausage, yeah.
[Jon] Okay, so it looks pretty simple. What do we have here for ingredients?
[Michael] We are going to mince, she calls for ham or veal, I decided I could use ham and veal. I have a pound of veal. I have a pound of ham, and a half a pound of suet.
[Jon] If you’re looking for suet, it can be very difficult to find, on our website and in our print catalog, we have this wonderful suet that is available. It’s called tallow here but it’s what they would have called suet in the 18th century. It’s rendered kidney fat, not muscle fat.
[Michael] I’m going to be introducing the two meats and the suet together, mix that all up. I’m going to add 1 egg yolk as a binder, and then I’ve got salt, pepper, mace, sage, and cloves. I’m just going to mix that in. This recipe originally called for an entire leg of ham, of pig, and it was 12 pounds of meat put together, so we’ve really reduced these quantities, but they are to taste. Now that we’ve got this thoroughly mixed, the recipe is simple. It just says to roll these out the thickness of a finger, so these are going to be about the size of a breakfast sausage.
[Jon] And they smell good right there, just with the spices and everything.
[Michael] These are wonderful.
[Jon] They look great.
[Michael] It’s surprising how light these sausages wind up being.
[Jon] Right, you would think, oh, they’re going to be heavy, but the fat actually does something completely different than what you would expect, and these in different circumstances, you might just call these a forced meat sausages.
[Michael] Yep.
[Jon] Same thing.
[Michael] Yep. Forced meat is taking the meat and making it be something other than what it looks when it’s just a cut of meat.
[Jon] Okay, I’ve got the pan good and hot and I’ve got a good little bit of suet already in the pan. You could use butter to cook these in, but the suet’s not going to burn and smoke the same way butter would, so I recommend either a rendered butter, like a ghee, or the suet. I’m going to be very gentle with these so that they don’t fall apart, because they’re not like your modern breakfast sausage.
[Jon] Okay, the sausages are done and the recipe actually calls for these to have a little mustard sauce.
[Michael] It didn’t say what the mustard sauce consisted of, so simple mustard sauces are just butter and mustard seed. I’ve added vinegar and some white wine, sugar, a little salt. That’s what my sauce is.
[Jon] Well, it looks great. I guess, let’s give these a try.
[Michael] I’m ready.
[Jon] Are you?
[Michael] Yes.
[Jon] Mmm, look at that.
[Michael] I’m about to double dip. Ah man, those are excellent.
[Jon] You would compare these with a modern day breakfast sausage right? But they are not the same. These are much lighter of a texture, not nearly as firm.
[Michael] Not as dense.
[Jon] Right, and a mustard sauce, something I would not have expected. Not something I would have naturally put on something like this, but
[Michael] It’s like a heavy stone ground mustard. It’s got that kind of taste to it. These things, the suet just melts away, melts right out of it, so that you have these great little voids and it’s a light sausage.
[Jon] Its got some wonderful spicy flavors in there, the nice quantity of saltiness.
[Michael] I would have told you I hated cloves, but they really add something to this. It’s really low key.
[Jon] This one is great. It’s definitely easy, it’s simple. You should be able to do this in nothing flat and it makes a wonderful little sausage, so make sure to give this one a try. I want to thank you. I want to thank Michael for bring this, but I want to thank you for coming along with us as we savor the flavors and the aromas of the 18th century.
[Jon] If you’re new to our channel, I want to welcome you. You can subscribe by clicking the button right up here. Also check out our related videos. Thanks so much for watching.
Our recipe today comes from Maria Rundell’s 1808 cookbook, “A New System of Domestic Cookery.” This is a recipe for a minced pie, but it’s a little different. It’s got a different twist on it. It’s a lemon minced pie.
Butter an 8 inch tart tin very well and place short tin in the bottom.
Boil lemon peel about 20 minutes to get rid of some of the bitterness and make it easier to work with, then mince very fine.
In a ceramic or wooden bowl, pare, core, and chop apple very fine and mix together with suet, sugar, lemon peel, lemon juice and raisins. x3x3
Pour into short paste and bake around 400 degrees for about 20 minutes.
Cool completely, even overnight or refrigerate to remove from tart tin.
Transcript of Video:
We’re concluding our baking in the Dutch oven series with this wonderful little fruit tart. I think you’re going to be surprised with this one. Thanks for joining us today on 18th Century Cooking.
Our recipe today comes from Maria Rundell’s 1808 cookbook, “A New System of Domestic Cookery.” This is a recipe for a minced pie, but it’s a little different. It’s got a different twist on it. It’s a lemon minced pie. Let’s get started.
Today we’re baking this in one of our 8 inch tart tins. These guys are hand made by Dennis Kutch, one of our tin smiths. He does a wonderful job. They’re available in the print catalog and on our website. The original recipe actually calls for making this in patty pans and probably the closest thing you’ve got in a modern kitchen is a cupcake tin so this is actually meant to be small individual little pies or tarts. Today we’re making this in one of these tart tins because of course we’re going to be baking in a Dutch oven.
If you’re going to be using one of these 18th century style tart tins, the bottom doesn’t come out of this so you want to make sure to butter it really, really well or you’ll never be able to get it out of the tin. This tart tin’s already well buttered. We can just lay in our paste in the bottom, any paste will work fine here, but short paste will work great and if you’re interested in a short paste recipe I’ll put a link to our short paste episode down in the description section below.
Our first ingredient is lemon peel and you might immediately say, “well, wait a minute Jon, did they have lemons in the 18th century?” Obviously you see lemons all over in the cookbooks. It really depends on where you’re located and the economic level of the person as to how common lemons would be in their standard daily diet, but obviously they’re very popular in the cookbooks. In this particular setting, we’re going to be using lemons. What we’re going to do is, we need lemon peel and you can just peel off the peel of your lemon, cut it off in one nice long strip to make it easier to work with and boil your lemon peel about 20 minutes. This is going to get rid of some of the bitterness and make it much easier to work with. Once we’ve boiled this lemon peel, we can take it out and mince it nice and fine.
To mix this up, we need a nonreactive bowl, something like a ceramic bowl or a wooden bowl. Inside this, we’ve got 1 large apple chopped up. It’s been pared and cored and chopped rather finely. You’ll want to use some baking kind of apple. Golden Delicious might work well in this. That’s what we’re using right now. To this, we’re going to add the diced lemon peel that I talked about earlier, ¼ cup of suet, ¼ cup of sugar, the juice of 1-2 lemons, and ½ cup of raisins. Mix these up well. We are using suet in this recipe. It can be difficult to find. We do sell a USDA approved suet in our catalog and on our website. You may be able to find some kinds of suet in your local supermarket or at your butcher shop. Again, if you’re interested in suet I want to point you to an earlier episode we did on rendering your own suet.
We need to cook this at around 400 degrees so we’ll need to get this Dutch oven nice and hot before we put this in and make sure it’s got plenty of coals. It’s going to bake probably 20 minutes or so.
And there we go. This one’s definitely cool enough to handle. If we wanted this to really set up so that we might be able to get it completely out of the pan, you’ll want to let this cool overnight, maybe even in the refrigerator or someplace really cool to let it really solidify, because it’s going to be hard to get out of this tart tin. Some of those juices have boiled up out of it and come down the edges so it’s going to be hard to get out. I’m just going to take a slice out of this guy, because there’s no way at this kind of temperature that it’s going to come out whole.
Let’s give this a try.
That’s got an amazing punch to it. This is wonderful. I can see why they call it a lemon minced pie. It’s got a wonderful lemony flavor to it. That lemon peel and the lemon juice really come through and yet you get these other chunks of, I guess the meat of, the tart which is the apple and the raisin, which give you a wonderful sweetness, but the flavor that really comes through is the lemon.
So this concludes our Dutch oven series on a wonderful note. This will definitely make a wonderful dessert. If you’re in the field and want to do a simple one, excellent, you can make the crust right there. None of these things needs to be refrigerated so you can definitely do this in the field. So wonderful, if you get a chance, you can try this at home. Again, wonderful dessert dish. Definitely give this one a try.
I want to thank you for coming along while we experiment with these Dutch ovens, while we see exactly what you can do in a Dutch oven in the field. Amazing things, wonderful dishes, great. I want to thank you for coming along as we savor the flavors and the aromas of the 18th century.
If you’re new to our channel, I want to welcome you. You can subscribe by clicking the button right up here. Also check out our related videos. Thanks so much for watching.
Today’s recipe is a wonderful savory onion pie from “The Little Primitive Cookery” cookbook. This cookbook is a compilation of 18th century recipes that this particular author put together for people of lesser means. This onion pie was probably a substitute for a meat pie, because it is a very savory pie. You’ll also find this recipe in Hanna Glass’s cookbook and some other 18th century English cookbooks as well, so it’s a really interesting, fun recipe.
Potatoes
Apples
Onions
Boiled Eggs
Salt
1-2 tsps. ground Pepper
Mace
½ tsp. Nutmeg
Short Crust
Butter
2-3 tsps. Water
If you look at the original recipe, it says you’re going to end up using about a pound of potatoes, a pound of apples, a pound of onions, and a pound of eggs. That means the whole pie would weigh more than 4 pounds. That’s a huge pie, at least in the recipe. Our pie plate is much smaller, so we cut the recipe down quite a bit. In the end, you simply want to make sure you use about the same amount of potatoes, apples, onions, and boiled eggs so that you don’t have too much of one over the others. You want to fill your pie pan up to be sort of heaping but it will cook down a little bit.
To prepare your ingredients, you need to pare up the potatoes.
You want to pare them up fairly thinly so that you have nice thin slices. Next, you’ll need maybe two or three apples, just like the potatoes.
First pare and core them, then slice them nice and thin. Next up, onions, I mean this is an onion pie right? Again, about the same quantity, so if your onions are a little bit smaller, you might need 3 or 4, and you’ll want to, of course, take the outer layer off and slice them up nice and thin. Again, probably about a 1/8th of an inch, maybe ¼ inch maximum. Our last main ingredient is the boiled eggs.
It’s best to boil these the night before so they are cool. Let’s peel them up, and then slice them. If they’re fighting you, it’s alright. Even crumbled up, they’re going to work just fine, again, about the same amount.
Now let’s put together a quick spice mix that we’ll need as we’re assembling this.
First we have some salt, maybe a teaspoon or two, ground pepper. We want some mace in this, and of course we need half a teaspoon of nutmeg. Now we’re ready to assemble this.
You’ll need to make sure to have a pie crust ready. If you are interested in our pie crust you can check out this episode we did back in the third season.
Assembling this pie is really simple.
The recipe calls for just a couple little chunks of butter in the bottom and now let’s put a layer of potatoes in the very bottom of our pie. The recipe also calls for, as you’re putting these stages together, to put in a little bit of spices in each layer. Now we’re going to go with some apples and again with just a little bit of seasoning.
Now we’re going to come in with some onion on top then some of the egg. Keep going with the layers until your pie is full.
We’re going to finish this pie up by placing some chunks of butter on top and 2 or 3 teaspoons of water. We’re sort of steaming the ingredients in this pie. Let’s put this top crust on pinch together the edges well so it’s connected to the bottom crust. Finally, put 3 little slices in the top so this vents a little bit.
We don’t want it to bulge up with the steam pressure on the inside.
It’s ready to go in the oven. If you’re doing this in a standard oven in a modern kitchen, I would set the oven at about 350 degrees and this guy’s going to take at least 45 minutes, probably more like an hour to bake.
This is a great full meal pie. It’s a wonderful main dish. This is such an inexpensive, quick, and easy pie to make up. It only takes an hour or so to bake and the flavors are amazing. You’ll love it, the kids will like it; even a little bit of mushroom ketchup on top of this will set it off perfectly.
Transcript of Video:
Today’s recipe is a wonderful savory onion pie. Thanks for joining us today on 18th Century Cooking with Jas Townsend and Son.
So, today’s recipe comes from “The Little Primitive Cookery” cookbook. This cookbook is sort of a compilation of 18th century recipes that this particular 18th century author put together for people of lesser means and this onion pie is probably sort of a substitute for a meat pie. It’s a savory pie. You’ll find this recipe in Hanna Glass’s cookbook and in some other 18th century English cookbooks, so it’s a really interesting, fun recipe. Let’s get started.
This recipe is very simple. We need an equal quantity of potatoes, apples, onions and boiled eggs sliced up, so let’s get started. I’m going to pare up some potatoes here. You want to pare them up fairly thinly so that you have nice thin slices and then we can move on to some apples. You’ll need, again, maybe two or three apples, just like the potatoes. First we’re going to pare them and then core them, and now slice them nice and thin. Next up, onions, I mean this is an onion pie right? Again, about the same quantity, so if your onions are a little bit smaller, you might need 3 or 4, and you’ll want to, of course, take the outer layer off of these and slice them up nice and thin. Again, probably about an 1/8th of an inch, maybe ¼ inch max. And our last main ingredient here, the boiled eggs. I boiled these up last night. Let’s peel them up, and now I’m going to kind of slice them. They’re fighting me, but even crumbled up, they’re going to work just fine, again, about the same amount.
Now let’s put together a quick spice mix that we’ll need as we’re assembling this. First we have some salt, maybe a teaspoon or two, ground pepper. We want some mace in this, so I’ve got some mace here, and of course we need in every recipe, nutmeg, half a teaspoon of nutmeg total, and now I’m just going to stir these up. Now we’re ready to assemble this. We have all the ingredients set up and I’ve already got a short crust put into this red ware pie pan. You’ll need to make sure to have a pie crust ready. If you are interested in this pie crust you can go and check out the episode we did, I think back in the third season. I’ll put a link down in the description section.
Let’s assemble this pie. It’s really simple. First we’re going to start off with a little bit of butter in the bottom. The recipe calls for just a couple little chunks here in the bottom and now let’s put a layer of potatoes in the very bottom of our pie. The recipe also calls for, as you’re putting these stages together, to put in a little bit of spices in each layer. Now we’re going to go with some apple here, again with just a little bit of seasoning. That’s good, now we’re going to come in with some onion on top here and now let’s put in some of the egg. Now the instructions say to keep going with the layers. Now depending on how thick your pie is, you may not have enough room for another layer but I’m going to do a thin layer.
Now if you look at this recipe here, toward the end it says you’re going to end up using about a pound of potatoes, a pound of apples, a pound of onions, and a pound of eggs. That means this whole pie is going to weigh more than 4 pounds. It’s a huge pie, at least in the recipe. This pie in this pie plate is much smaller, so you won’t need a full pound. Obviously this is going to fill this pie right up though. It’s going to be sort of heaping, but that’s okay, it’s going to cook down a little bit.
We’re going to finish this pie up now by placing some chunks of butter up on top and a little bit of water too. Maybe 2 or 3 teaspoons, it calls for adding a little bit of water in here, we’re sort of steaming the ingredients in this pie, and let’s put this top crust on and let’s pinch this together and get this connected so it’s connected to the bottom crust. Now that we finished that up, we can just put 3 little slices in the top so this vents a little bit. We don’t want it to sort of bulge up with the steam pressure on the inside.
And here’s our assembled pie. It’s ready to go in the oven. If you’re doing this in a standard oven in a modern kitchen, I would set the oven at about 350 degrees and this guy’s going to take at least 45 minutes, probably more like an hour to bake.
Wow, this pie smells great. Let’s cut into it and see what it looks like.
Mmm, wow.
That is really, really good. It’s got a wonderful mix of flavors and spices and it’s so wonderful and savory and moist still. I mean with all that butter in there, you know it’s good. This is a great kind of full meal pie, you wouldn’t need to have a meat course if you had a pie like this that you were serving with maybe with just one little side dish or something. It’s a wonderful main dish. If you get a chance at all, and this is such an inexpensive quick and easy pie to make up, it only takes an hour or so to bake and the flavors are amazing, so definitely give this one a try. You’ll love it, the kids will like it, even a little bit of mushroom ketchup on top of this will set it off perfectly.
I want to thank you so much for joining me today as we come along and savor the flavors and the aromas of the 18th century.
If you’re new to our channel I want to welcome you. You can subscribe by clicking the button right up here. Also check out our related videos. Thanks so much for watching.
There seems to be a modern resurgence in baking in Dutch ovens, but this technique has been used for hundreds of years. Dutch ovens were commonly used in 18th century kitchens. They were known by various names and they took on various forms, but they were known throughout Great Britain, France and the American colonies. Dutch ovens played an important role in the American colonies as well as the later on Western expansion. Louis and Clark took numerous Dutch ovens along on their western expedition. These vessels were favored by 18th, 19th, and even 20th century cooks and sojourners for their versatility. They could be used for soups and stews, for frying as well as for roasting and baking, even bread.
We found one early 19th century source that used the term Dutch oven and bread oven interchangeably. When it came to baking for a single meal, these were much more efficient than a wood fired oven. Because of their versatility and efficiency, they were also highly valued. You could frequently find them in old 18th century last will and testaments and in household inventories. Jas. Townsend and Son offers two different sizes, a 9 1/2 quart and a 12 quart model.
The Dutch ovens sold at Jas. Townsend and Son are a specifically 18th century and North American improvement on a 17th century design. The lip at the top is specifically designed to keep the coals from falling off and the legs at the bottom are to keep it so the air can flow underneath and keep the coals underneath alive.
When using a Dutch oven, you need to make sure that it is preheated. Just leave it in the fire pit until it’s good and warm. You have to get your pit ready for this. You need coals underneath your Dutch oven. Deciding exactly how many coals you want to use is a bit of a matter of judgement. Each person is going to have to get used to that. You need to practice. I put a ring of coals around the top of the lid here leaving the center a little bit open. Same thing at the bottom, there’s a little bit of opening at the very center to not get it too hot. Each one of those is going to be just a little bit different though. For even cooking you will want to rotate your Dutch oven every 5-10 minutes or so and you will want to check on your food about every 15 minutes to ensure that the oven is not too hot or cold and adjust accordingly.
Combine flour, bread crumbs, raisins, sugar and ginger in one bowl. In another bowl beat together the eggs, yolks, and heavy cream. Combine all the ingredients for a nice thick batter. Turn out into a well buttered dish. Bake for about 45 minutes at 350 degrees.
For sauce, melt butter and combine with sugar and brandy.
Allow pudding to cool then turn out onto plate, slice and cover with sauce.
Transcript of Video:
Hi, I’m Jon Townsend. We’re continuing our series in Dutch oven cooking. Today we’re going to be using the skills that we’ve learned earlier to bake a pudding, a bread pudding, in one of these Dutch ovens. Thanks for joining us today on 18th Century Cooking.
This recipe is rather simple. It’s from the Primitive Cookery cookbook 1767. That cookbook is available on our website and in our print catalog. Let’s get these simple ingredients together. Our ingredients are rather simple. We’ve got ¾ of a cup of flour along with 1 cup of bread crumbs. Also 4 ounces of raisins or currants. I’ve got 2 tablespoons of sugar and just a half a teaspoon or so of ground ginger. For the wet ingredients, I’ve got 2 whole eggs and 2 egg yolks and one cup of heavy cream.
Now that we’ve got the wet ingredients all beat up, let’s pour them in, mix the two together. We’re looking for a nice thick batter.
I’m going to turn this out into a well buttered dish.
This is ready to go. Let’s put it in the oven. It’s a beautiful day out and there’s very little wind so we found by previous experience with a 12 inch Dutch oven like this, we’ll need about 2 scoops of coals beneath and 3 scoops on top. We want this to bake for about 45 minutes at 350 degrees. If you haven’t watched our previous episode where we talked about getting these ovens up to heat, make sure to go back and check those out. I’ll make sure to put a link down in the description section of this video. This is feeling like it’s really preheated and ready to go.
I’ve let this cool and we’re going to turn it out onto a plate and now slice it and oh yes we need finally, the thing that really sets all these puddings off is a pudding sauce. Do not forget the pudding sauce. This particular sauce is 1/3 butter, 1/3 sugar and 1/3 brandy, so let’s give this a try.
Mmm, superb flavors, and that sauce, I could eat that sauce all day, it is wonderful. A great little pudding, very easy to bake in one of these Dutch ovens. Extremely easy to mix up and very simple ingredients. This is superb. So we’re experimenting. We’re trying out different things and I really want to thank you for coming along as we savor the flavors and the aromas of the 18th century.
If you’re new to our channel, I want to welcome you. You can subscribe by clicking the button right up here. Also check out our related videos. Thanks so much for watching.
Make sure to preheat your Dutch oven. This needs to cook rather slowly at a low temperature. We don’t want to overheat this, so maybe 300 degrees is what we’re shooting for.
To prepare this pie, I’m using a 9 inch red ware pie plate. Line the outside of the pie plate with puff paste which is a typical instruction you’ll get in 18th century cookbooks. You can use either puff paste that you buy at the store in the frozen food section or watch our video on making your own puff paste.
I’m starting by placing a tablespoon and a half of butter in the bottom of my pie pan. I’ve taken a 2 pound shoulder roast and sliced it into about ½ inch thick slices and trimmed all the gristle out. I’m going to put a layer of steak in the pie pan and follow this with a little bit of salt and pepper, then sprinkle a nice bit of flour on top of that. We want a good layer of flour here to make a great gravy.
Next, I’ve got some nice big slices of white onion and top off this layer with another tablespoon of butter. You should be able to repeat this step for about 3 layers. Don’t make your layers too thick so that they can cook evenly. Once our pie has all the layers built together, now it’s time to put in some liquid. We can use a couple of different liquids such as water, hard cider, a small beer or light beer, or even mushroom ketchup. Anything is going to make a good liquid for our pie. It’s best to pour in some of the liquid around the edges right now before you put the top on, because it can be hard to get all the liquid that we want into the pie.
Now it’s time to put on our puff paste top and pinch it down. You definitely want a good seal between the body of the pie crust and this lid so make sure to wet the edge if the top isn’t going to seal well. Once the lid is down nice and tight, then we’re going to cut a little hole in the top and pour in another tablespoon or two of our liquid and then we’re ready to bake.
Gently place the pie into your preheated Dutch oven and replace the lid. We want maybe a scoop and a half of coals around the bottom edge of this Dutch oven and maybe two scoops on top, two and a half scoops max. We don’t want to overdo this or else our meat will be tough if we cook this at too high a temperature. We also want to make sure to remember that we need to continue to rotate this oven 90 degrees every 15 or 20 minutes and rotate the lid separately, because our coals might be hotter on one spot than the other and we don’t want to overcook one spot over another.
When this pie is done, we definitely need to let this guy rest. It can even be eaten cold, and the colder we let this get, the more it’s going to come out in one piece.
Transcript of Video:
Dutch ovens were extremely versatile and that’s one of the reasons why they were so popular in 18th and 19th century North America. Today we’re doing a savory beef steak pie. Thanks for joining us today on 18th Century Cooking.
This recipe comes from Amelia Simmons’s 1796 cookbook American Cookery. If you haven’t watched our earlier Dutch oven cookery series explaining getting these ovens up to heat, I would encourage you to do so. I’m setting my 12 inch Dutch oven over a bed of coals and putting a few coals on top to preheat it so that it’s ready to go when we’re ready to put this pie in.
To prepare this pie, I’m using a 9 inch red ware pie plate. These are the pie plates that our Master Potter Gary Nieter makes. They’re wonderful pie plates. You can find them on our website or in our print catalog. I’m lining the outside of the pie plate here with puff paste and this is a real typical instruction you’ll get in 18th century cookbooks, to just line the outside with puff paste. You can use either puff paste that you buy at the store. You can find it in the frozen food section or there’s a video that we do on making your own puff paste. I’ll make sure to put a link down in the description section for that.
I’m starting by placing a tablespoon and a half of butter in the bottom of my pie pan. In this recipe, we’ll end up using about a ¼ of a pound of butter so be prepared for that. I’ve taken a 2 pound shoulder roast and I’ve sliced it into about a ½ inch thick slices and now I’m going to start to layer that in, so first we put in a layer of our steak. This is a really nice cut. I’ve already trimmed all the gristle out. I’ll follow this with a little bit of salt and pepper and then I’ll sprinkle a nice bit of flour on top of that. We want a good little layer here. This is going to make a great gravy.
Next I’ve got some nice big slices of white onion and I’ll top off this layer with another tablespoon of butter. Now we’re going to repeat this again. Again we’re going to put down a layer of steak nice and thin. We don’t want it to double up here and again we put on the salt and the pepper and the flour and then the onions again and after the onions, butter again. You should be able to get about 3 layers in your pie. Now that our pie has got all the layers built together, now it’s time to put in some liquid and we can use a couple of different liquids. We could use water, we could use hard cider or a small beer or a light beer if you’ve got that. Anything is going to make a good liquid for our pie. I’m going to pour in some of the liquid right now before I put the top on, around the edges because it can be hard to get all the liquid into the pie that we want to get.
Now it’s time to put on our puff paste top, and here’s our puff paste that we’re going to put on the top of our pie and we’ll put this on and pinch it down. You definitely want a good seal between the body of the pie crust and this top layer, this lid that we’re going to put on, so make sure to wet the edge if the top isn’t going to seal well. Now make sure to pinch this lid down nice and tight, then we’re going to cut a little hole in the top and then pour in another tablespoon or two of our liquid on top of that and then we’re ready to bake.
The pie is ready to go into the oven and of course I’ve already preheated this oven so it should be close to temperature. I don’t need to worry about that. Let’s go ahead and remove the lid and place this pie in here gently and let’s close this up. This needs to cook rather slowly at a low temperature. We don’t want to overheat this, so maybe 300 degrees is what we’re shooting for. We talked about trying to keep a lower heat in an earlier episode in this series; in this case we want maybe a scoop and a half around the bottom edge of this Dutch oven, so make sure to refresh your coals after you preheat it and maybe two scoops on top, two and a half scoops max. We don’t want to overdo this or else our meat will be tough if we cook this at too high a temperature, and from an earlier episode, we want to make sure to remember that we need to continue to rotate this oven 90 degrees every 15 or 20 minutes and we keep picking up and rotating it around and rotate the lid separately. You want to keep rotating the lid. The problem, especially in this case where we’ve got the fire pit off to the side, it’s going to be hotter on one side than the other, so that’s why we want to keep rotating it and our coals might be hotter on one spot than the other, we don’t want to overcook one spot over another so we keep rotating those, the lid and the body around a little separately.
Someone asked in an earlier episode about the tools I was using and really I only need a couple real good tools for a Dutch oven cooking. You can do without some of these but you really need a couple of them to do it well and to do it easily, let’s just say that. Mainly we definitely are going to need a Dutch oven, we sell a couple different sizes of those. A trivet is probably the next most important piece. A nice triangular trivet. If you don’t want to have a trivet like this, you can just use a couple of stones that are the same size, 3 or 4 stones or even an S-hook thrown in the bottom here, a couple S-hooks will do the same job, but the trivet does a really good job. I like to use a real trivet when possible. A pie pan, these pie pans are great and we use them so many times, if you want to keep things up off the bottom you’re going to need to cook on top of that trivet with something like a pie plate.
Also, a pair of these little ember tongs, excellent for doing individual pieces. Sometimes you want to get pretty precise, ember tongs help you pick those up and do some precise work. The Dutch oven lid lifter is a killer tool that really makes it much easier to get the lid off of these without them falling over. I mean you can just use a hook, but the lid can tilt and all your ashes can drop right into the Dutch oven which ruins it. The Dutch oven lid lifter helps you lift that up and with these extra prongs balance it so it stays level, so it’s a really handy tool and you can just use the hook to pick up the whole Dutch oven and rotate it. You’ll really need that tool. Also you’re going to need some kind of a shovel and you really don’t need a big shovel. These little hearth shovels that we have in the catalog are perfect. They pick up just the right amount of coals and they’re nice and small and they don’t have a handle that can burn up so they’re really handy for working with these Dutch ovens.
And the last tool I really suggest is a pair of leather gloves. We don’t have these in the catalog but you can get a pair of welding gloves, look for something that’s not looking too modern. You don’t want blue ones, so if you can find a nice pair of brown welding gloves, these make it so much easier to get those pie pans out of there or to just lift up the oven or the lid at times when you don’t want to burn yourself obviously so these are really helpful to have. There are some other tools that we don’t carry that can make it easier like sometimes there’s a special tool to lift pie plates up out of the Dutch oven, boy that’s a lot of bother to carry too many tools, this is probably enough for just about anybody.
Wow this looks tremendous. It is ready to go. You know this reminds me of the beef pasty we did a number of years ago.
So we definitely need to let this guy rest. It can even be eaten cold, and the colder we let this get, probably the more it’s going to come out in one piece. I can’t wait that long, so let’s cut into this so we can try it out.
Okay this really smells good and it’s time to try it out. I really want to put some mushroom ketchup on it right away but I’m going to wait because I want to see what this really tastes like before I put the wonderful mushroom ketchup on it.
That’s a tremendous mix of flavors. Excellent. The beef, perfectly tender, wonderful. Puff paste, you can’t go wrong, and that onion flavor in there along with the spices and I did not put too much pepper, do not worry, you can always put a little bit more on but it’s perfect medley of flavors. Amazing, and now let’s try it with the mushroom ketchup. I know this is really going to set it off.
Mmm. Wow, that little bit of vinegar taste and the extra salt and the mushroom flavor, to die for. I think I wanted, instead of the water, I should have just dumped mushroom ketchup in right on top before I cooked it. This would be a tremendous thing to cook at an event. Everyone will love you so you should try this one out. The flavors are tremendous. It’s not difficult to do. There aren’t even that many ingredients, so definitely try this one out. I want to thank you for coming along as we try these things out as we savor the flavors and the aromas of the 18th century.
If you’re new to our channel I want to welcome you. You can subscribe by clicking the button right up here, also check out our related videos. Thanks so much for watching.
White pot is a sweet, buttery, bready, custard type bread pudding originating from 18th century Devon in southwest England. The term white pot simply means white pudding. Recipes for white pot changed very little over the years and between regions. They primarily consist of bread, sometimes rice, sugar, eggs, usually cream, some spice, and sometimes a little bit of fruit.
1 pint Cream
1 Cinnamon Stick
Pinch of Salt
Mace
Fresh Nutmeg
2 whole Eggs plus 1 Egg Yolk
4-5 tbsps. Sugar
Loaf of White Bread
½ cup butter
Plenty of Raisins and Dates
Fresh Cream or Sac (optional)
The first thing we need to do is preheat our oven. If you’re going to use a Dutch oven you need to get an ember bed ready for that. If you’re using a wood fired oven, that needs to be fired up, but you’ll need to let it cool down a little bit to get to the right temperature. If you’re using a regular home oven, you need to preheat it to 350 degrees.
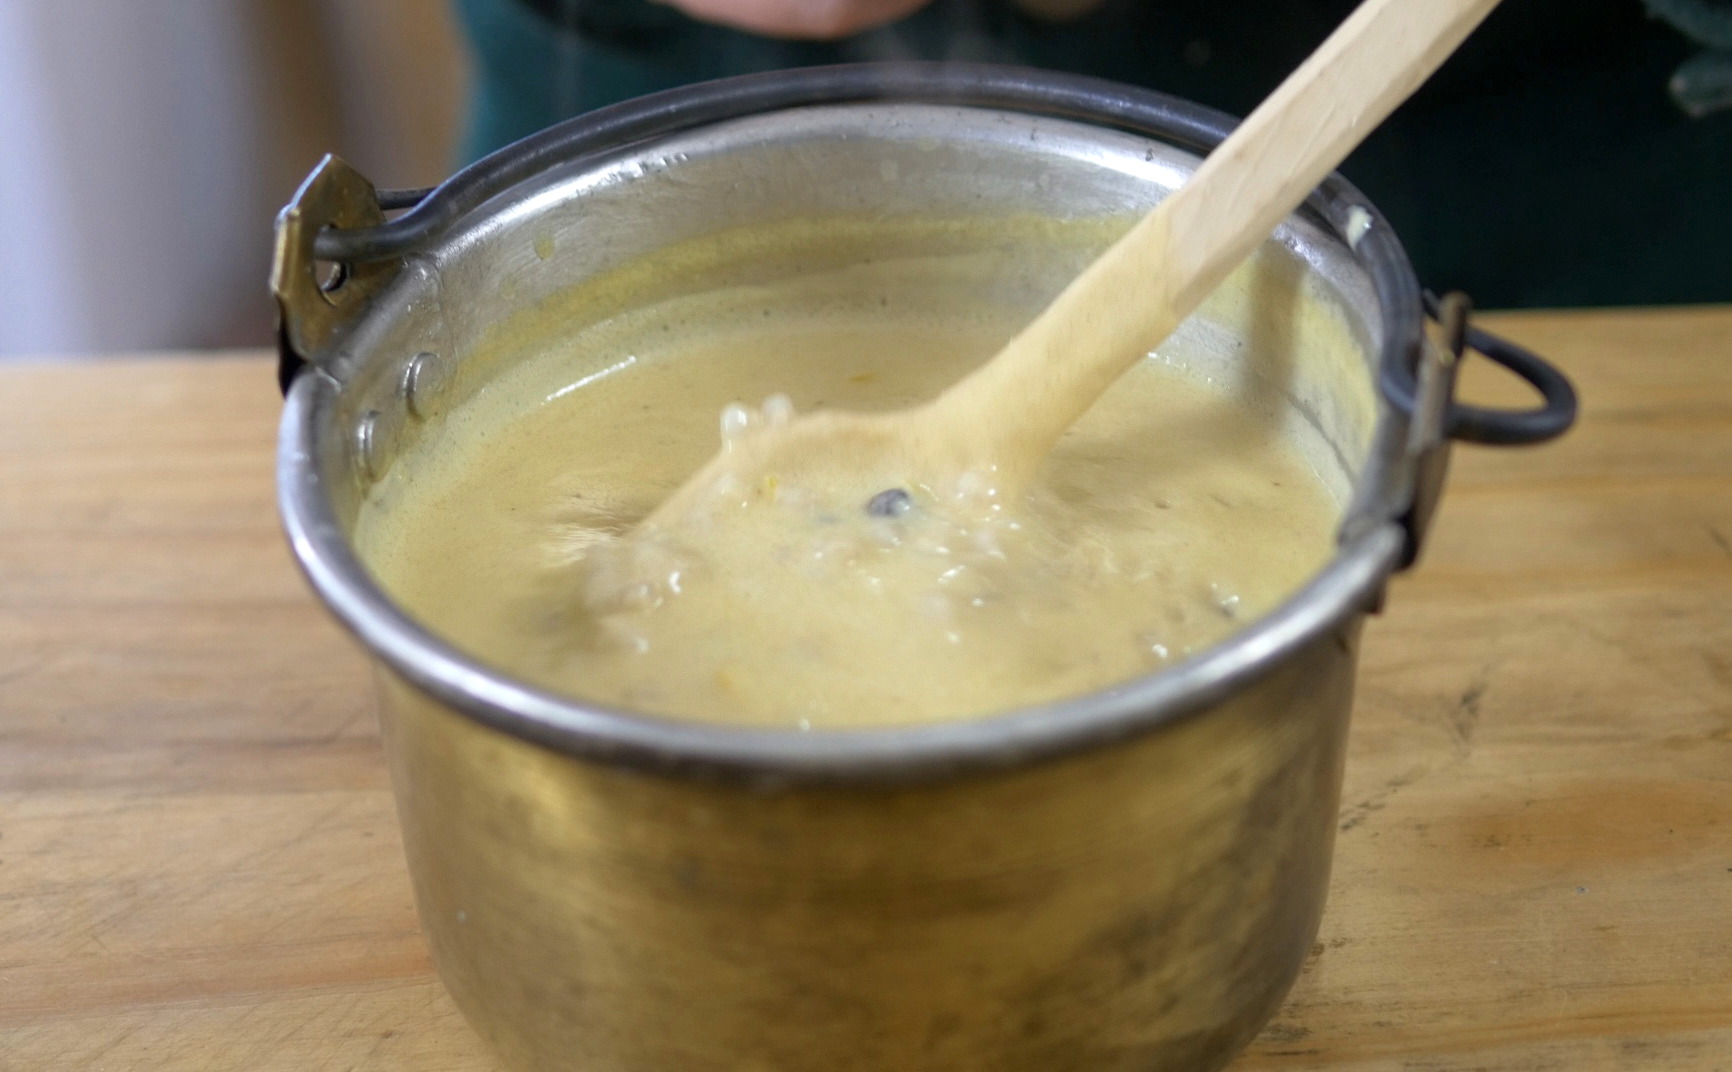
We’re using our everted saucepan today, but you could use a pipkin, a boiler. or whatever you have available. Begin by placing a pint of cream in the saucepan, followed by a stick of cinnamon, a pinch of salt, a little bit of mace, and some fresh ground nutmeg. As soon as this begins to simmer, you’re going to need to remove it from the heat to let it cool.
Now let’s take care of our eggs. We need two whole eggs one egg yolk, along with 2-3 tablespoons of sugar, and whisk this all together.
Next we are going to take some nice white bread slice it very, very thin as well as removing the crust so you’re left with nothing but the crumb. You’ll need enough crumb to fill your baking pan or tin. In this case we are using one of our tin eating bowls, but you could also use something bigger, like one of our milk pans, but you would then need about twice the amount of ingredients and to increase the baking time. Butter each of these slices liberally on one side. You will end up using about a half a cup of butter or one full stick. While the butter is out, go ahead and butter your pan or tin as well. Make sure that this is buttered liberally as well or the sugar in the white pot will make it very difficult to release later.
Once the cream has cooled a bit, you can remove the cinnamon stick, then add just a little bit of the warm cream mixture into the eggs while whisking it just a little, to temper the eggs, so the eggs don’t curdle. Once we’ve got a little bit completely whisked in, we can start adding the rest of the cream little by little.
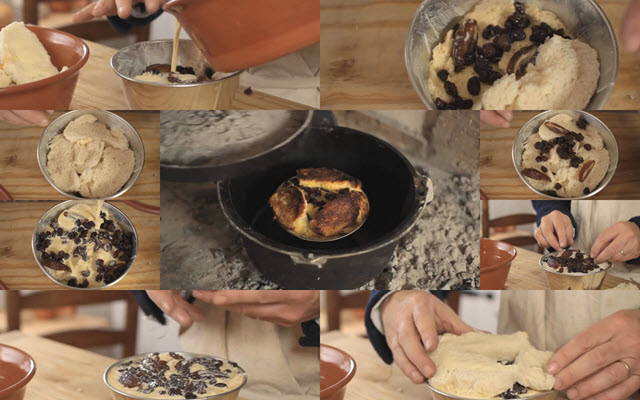
Now we can start layering our pudding. We’re going to start by putting in a layer of bread on the bottom of our bowl butter side down to completely cover up the bottom of the bowl. Next, let’s put a layer of raisins and dates in on top of that. Then another layer of the bread, butter side down, making sure that there are no air gaps. If you need to tear your bread up a little bit to fill in the gaps do that. The next layer is the raisins and dates again.
Once we have our second layer in the pan, we can start to add some of the custard mixture. Pour in just enough that it soaks into the two bottom layers but doesn’t come up above the top of the bread. Once that is done, continue layering your pudding until the dish is filled up. Finally, pour in the rest of the custard mixture until it fills up the rest of the tin and soaks completely into the bread. Place the final pieces of bread butter side up to fill up the top and tamp them down a little so they soak up the custard from underneath. Sprinkle about 1-2 tablespoons of sugar on top and it’s ready to bake.
Check on your choice of oven to make sure that it has preheated to the correct temperature. If you are using a Dutch oven, set up a ring of coals to set it on and place a trivet inside to set the white pot on. Once the lid is added, place coals around the top of the lid as well. You will need to keep watching the Dutch oven to make sure the coals stay hot enough and renew the coals on the top and bottom as they cool. This will take about 35 minutes but it is a good idea to watch as it will burn quickly.
Allow to cool for a few minutes and then turn out onto a plate. For added enjoyment, you can sprinkle some sugar on top and brown it using a heated salamander, kitchen torch, or broiler, just be careful not to burn it. A nice finishing touch would be some fresh cream poured on top. Sac, which is what we call sweet cherry, was also very common in 18th century recipes.
Transcript of Video:
Foods of the 18th century were often very regional. Take for instance, this little dish, its sweet, it’s buttery, it’s custardy, and it’s bready. It’s a bready little dessert. It’s also got raisins and dates in it. In many places, this might be called a bread pudding, but this regional variation is famously known as white pot.
We found a number of white pot recipes, some as early as the 16th century and others right on into the 18th century. The term white pot is a provincial phrase originating from southwest England, specifically the Devon area and it simply means white pudding.
Recipes for white pot change very little over the years. They primarily consist of bread, sometimes rice, sugar, eggs, usually cream, some spice, and sometimes a little bit of fruit. Let’s get started. The first thing we need to do is preheat our oven. We’re going to be using the Dutch oven today. If you’re going to use a Dutch oven you need to get an ember bed ready for that. If you’re using a wood fired oven, that needs to be fired up, but you’ll need to let it cool down a little bit to get to the right temperature, and if you’re using a regular home oven, you need to preheat it to 350 degrees.
We’re using our everted saucepan today. You could use a pipkin or a boiler or whatever you have available. We’re going to begin by placing a pint of cream in our saucepan. Now let’s place a stick of cinnamon in that, a pinch of salt here, a little bit of mace, and now let’s grind some fresh nutmeg.
As soon as this begins to simmer, you’re going to need to remove it from the heat and let it cool down. Now let’s take care of our eggs. We need two whole eggs in this and we need one egg yolk, and now we need two to three tablespoons of sugar. Now all we have to do is whisk this together.
Now that our cream is simmering, let’s go ahead and take it off and let it cool down. I’m going to take some nice white bread now and I’m going to slice it very, very thin and then take off the crust so I’m left with nothing but the crumb. We’ll need enough crumb to fill up our baking. In this case I’m using one of our tin eating bowls. You could also, if you wanted a larger one, use one of these milk pans, but you definitely need about twice the amount of ingredients and you need to increase the baking time.
Each one of these slices, I’m going to butter quite liberally on one side. I’m going to end up using about a half a cup of butter, one stick. While we’ve got our butter out, it’s time to butter our pan. The bowl needs to be buttered liberally or the sugar that’s in our white pot will make it very difficult to release.
And now our cream has cooled a bit, we can take out the cinnamon stick and now we’re going to add just a little bit of the warm cream mixture into the eggs while we whisk it just a little bit first to temper the eggs so that the eggs don’t curdle. Once we’ve got a little bit in, we’ve got that totally whisked in; we can start adding the rest little by little.
Now let’s get started with our layering. We’re going to start by putting in bread on the bottom of our bowl. We want to put the butter side down. We’re going to put in two pieces here and we’ll cover up the bottom of the bowl and now let’s put a layer of raisins and dates in on top of that. That’s good. We’re going to do another layer, butter side down of the bread. So we want to make sure that there are no air gaps so if you need to tear your bread up a little bit to fill in the gaps do that. Our raisins and dates again. Once we’ve got our second layer here, we can start to add some of our custard mixture. We’re going to just pour in enough that it soaks into these two bottom layers but doesn’t come up above the top of that bread.
So that looks pretty good. Let’s just do another layer.
Our dish is filled up. Let’s put our custard mixture in until it fills it right up and soaks in. That looks good. I think we’ll be able to use just about all of it. That looks good. Now we’re going to take our final pieces of buttered bread and we’re just going to fill up the top. We’re going to put this in butter side up instead of butter side down and fill that top.
Oh yeah, there we go. We’re going to tamp that down just a little bit so that it soaks up from the bottom and now we’re going to add some sugar to the top of it. We probably got another tablespoon here or so. Now that’s ready to bake.
Now it’s time to bake this guy. We’re going to be using this Dutch oven. I’ve got it already preheated some, and we’re going to set it on a ring of coals that we’ve got already set up here. Now let’s place our trivet inside and then we can add our pudding, our white pot in, right up on top, and we can set our lid on. I’m going to put some coals up on top. Again, usually we just need a ring of coals that go around the outside edge here.
Okay, we’ve got our ring of coals up on top so I’m going to keep watching this and at times I’ll have to renew the coals up on top and maybe even tuck a few more in the bottom.
While white pots originated from the Devon area, they were certainly well known to colonial cooks as well. While they might not have kept the same name, they kept the same construction. Bread puddings are becoming popular again today and some chefs have even discovered this interesting variation.
It’s starting to smell really good and it’s only been about 35 minutes. Let’s take a quick look at this. As you can see this is already well on its way, so we’re going to take this out. This is done.
We’re going to let this cool and then turn it out onto a plate.
If you happen to have a salamander, you can heat it up very hot, then sprinkle some sugar on top of your white pot and brown it. You can also do that with a kitchen torch or with a broiler. Just be careful not to burn your white pot.
A nice finishing touch would be some fresh cream poured on top or maybe a little sac which is what we call sweet cherry, was very common in 18th century recipes.
Wow, that is excellent. Its buttery, the sweetness of the sweetmeats and the custard really sets it off. It’s delicious. You’re going to love this.
All the items you’ve seen here today, the cooking utensils, the clothing, all these things are available on our website or in our print catalog. Be sure to subscribe to our YouTube channel and don’t forget to follow us on Facebook.
There is a bread baking technique that has been floating around the internet since about 2007, but it’s not a new idea, it’s been around for hundreds of years. A very simple dough with high moisture content that is baked in a Dutch oven. It’s called No-knead bread and, because of its simplicity and its great flavor, is a very innovative technique compared to modern bread baking methods. This no-knead bread is an 18th century French bread, though it is nothing like modern French breads which are known for being a firm white bread with an open crumb structure and a crispy crust. French breads in 18th century cookbooks are always made with milk and sometimes eggs and butter, had its crust either rasped away or chipped off with a knife, and was commonly used as an ingredient in other dishes such as porridges, soups, and even other breads.
3 Cups Flour
1 ½ tsp. Salt
Barm or barm substitute:
½ cup water
1 heaping tbsp. Flour
¼ – ½ tsp. Instant Yeast
1 Egg White
2 Egg Yolks
¾ cup Milk
2 tbsps. Melted Butter
In a large bowl, put 3 cups of flour, bread flour or all-purpose flour will do, and about 1 ½ teaspoons of salt.
The original recipe calls for barm and since nobody has barm, which is the foam from the top of beer, instead we’re going to make a substitute barm. In a separate container, let’s start with a half a cup of water. To that, add a heaping tablespoon of flour and a half a teaspoon of instant yeast, then we can stir this all together and let it rest.
Now for the rest of the wet ingredients, take just one egg white and add that to ¾ of a cup of milk and whisk together.
Now take 2 tablespoons of melted butter and put that in with the 2 egg yolks and whisk those together.
Now let’s add all the wet ingredients together including the barm mixture, then mix the wet ingredients with the dry ingredients. As soon as the dough is formed and all the flour is absorbed, it’s time to stop mixing because they call for this dough not to be kneaded. It makes a very wet and sticky dough, a very light paste.
Cover the bowl with a damp cloth and set it aside 12-24 hours. You could divide this dough up and put it into smaller, well-floured bowls to make rolls as well.
Once it has a nice spongy texture to it, it’s time to preheat your Dutch oven. Don’t skimp on preheating this or your bread won’t turn out right. Once it is preheated, sprinkle some cornmeal into the bottom to keep it from sticking. If your Dutch oven is preheated correctly you should see the cornmeal brown up just a hair. If you’re going to bake this in your home oven, you’re going to want to set your oven to 450 degrees.
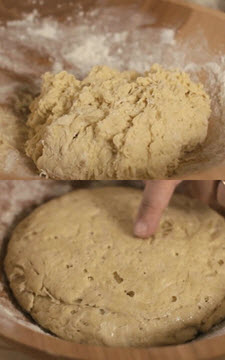
Turn your dough out onto a liberally floured surface. Now your dough may be very sticky, but that’s okay. It’ll help to flour your hands so that it doesn’t stick. Pat down the dough a little bit, then fold it a third of the way then fold the other side over on top of that, turn it and fold it over again the same way so that you folded it four times then place it in the Dutch oven.
You want to keep a close eye on this while it’s cooking. It’s going to take 25-30 minutes. You want it to be a nice deep golden brown without burning on the bottom.
You want to make sure that your bread is completely cooled before you rasp or chip off the outer crust. The crust and also the French bread as it is, is used in many 18th century recipes.
Transcript of Video:
There’s been a very interesting bread baking technique that’s been floating around the internet since about 2007. It’s called No-knead bread. It uses a very simple dough, a high moisture content and it’s baked in a Dutch oven. I would encourage you to watch the video sometime, it’s very worthwhile. No-knead bread, because of its simplicity and its great flavor, is a very innovative technique compared to modern bread baking methods, but I’ll let you in on a little secret, now this is not a new idea. In fact, no-knead breads have been around for hundreds of years. Today I’m going to show you how to do an 18th century version of no-knead bread. We’re going to bake it in an 18th century manner. We’re going to use that old Dutch oven that so many modern bakers are falling in love with.
There are many different kinds of breads in the 18th century. Some of them were baked from very fine white flour, others made from very course flour, still others were made with wheat flour mixed with other grains, but today we’re going to focus on a bread known by the 18th century British and North American colonists as French bread. Now when I say French bread, what one might think is a baguette, a batard, or a brioche. Most people think of a French bread as a firm white bread with an open crumb structure and a crispy crust. Numerous 18th century English cookbooks contain recipes for French bread, but this French bread is nothing like the modern French bread. Modern breads made with just flour, water, yeast and some salt. No, these French breads in these 18th century cookbooks are always made with milk and sometimes eggs and butter. This English version of French bread was made into loaves or into rolls. The rolls were sometimes referred to as machete bread which can mean the quality of a bread or sometimes its size and shape. This French bread had its crust either rasped away or chipped off with a knife. 18th century French bread was commonly used as an ingredient in other dishes. The bread crust was often used in porridges, soups, even in other breads. Let’s make some of this French bread.
In a large bowl, let’s put 3 cups of flour, bread flour or all-purpose flour will do, and about 1 ½ teaspoons of salt. That’s it for the dry ingredients. Let’s do the wet ingredients. The original recipe calls for barm and since nobody has barm, which is the foam from the top of beer, instead we’re going to make a substitute barm. Let’s start with a half a cup of water. To that I’m going to add a heaping tablespoon of flour and then we need some yeast. We’re going to use instant yeast. You need about a quarter of a teaspoon to a half a teaspoon and then we can stir this all together.
Now for the rest of the wet ingredients. I’m going to take just one egg white. Let me crack this egg, and we’re going to add that to ¾ of a cup of milk and whisk that together.
Now I’ve got here 2 tablespoons of melted butter and I’m going to put that in with 2 egg yolks and we’re going to whisk those together. Now let’s add this all together and we can put in our barm mixture too, and that’s it for our wet ingredients. Now we’ll mix the wet ingredients with the dry ingredients and I’ll mix them with these.
As soon as the dough is formed and all the flour is absorbed, it’s time to stop mixing. Now one of the interesting things about the 18th century recipes is that they call for this dough not to be kneaded. It makes a very wet and sticky dough. They call it in the recipe a very light paste. We’ll cover this with a damp cloth and set it aside 12-24 hours. We could divide this dough up and put it into smaller, well-floured bowls to make rolls.
Now we’ve prepared this batch ahead of time and it’s been rising about 18 hours so it’s got a very nice spongy texture, so it looks like it’s time to start preheating our Dutch oven.
We’re going to be baking our bread in a Dutch oven today. Baking bread in Dutch ovens is very common in the 18th century although our recipes don’t call for that specifically. We have this oven over the fire and it’s warmed up. Don’t skimp on preheating this. You want it to be nice and hot when you get started. I’m going to go ahead and sprinkle some cornmeal into the bottom of that. This’ll keep the loaf from sticking. Just a very thin layer here looks good, and it should brown up just a hair so you can see that the oven is getting the right temperature.
Now it’s time to look at our dough. Now I’m going to turn this out onto a liberally floured surface. Now your dough may be a lot stickier than this, but that’s okay, but it’ll help to flour your hands so that it doesn’t stick, and now let’s pat this down a little bit, let’s fold it once, let’s fold it twice, three times, and one last time. Four times we’re going to fold this and now let’s put it in our Dutch oven. You want to keep a close eye on this while it’s cooking. It’s going to take 25-30 minutes. You want it to be a nice deep golden brown without burning on the bottom.
If you’re going to bake this in your home oven, you’re going to want to set your oven to 450 degrees. There, that looks perfect. I’m going to take it off. And there it is, an 18th century enriched no-knead bread. Something that they called, in the time period, French bread. We want to make sure that our bread is completely cooled before we rasp or chip off the outer crust. The crust and also the French bread as it is, is used in many 18th century recipes.
I invite you to subscribe to our new blog, SavoringThePast.net. On there you’ll find recipes and discoveries about 18th century cooking. Also, make sure to subscribe to our YouTube channel so you can get notification of all the new videos as soon as they come out and of course follow us on Facebook so you can find out all the great news from Jas. Townsend and Son. Jas. Townsend and Son carries hundreds of quality 18th and 19th century reproduction clothing items and personal accessories, including a great line of cooking vessels and utensils. All these can be found on our website or in our print catalog. Thanks for watching and I invite you to come along and join us as we savor the aromas and flavors of the 18th century.


 Moisten two of the edges of the puff paste and fold it into a triangle then pinch the edges shut.


 Remove from heat, allow to cool and
 Today Michael Dragoo is helping us with an Oxford Kate sausage recipe from Martha Washington’s cookbook. Martha Washington believes this should have been called Oxford Gate sausages after a tavern located near the north gate in Oxford but may have been misnamed.
 Simply mix the ingredients together well using the egg yolk as a binder. Add the


 Today’s recipe is a wonderful savory onion pie from “

 Again, about the same quantity, so if your onions are a little bit smaller, you might need 3 or 4, and you’ll want to, of course, take the outer layer off and slice them up nice and thin. Again, probably about a 1/8th of an inch, maybe ¼ inch maximum. Our last main ingredient is the boiled eggs.

 You’ll need to make sure to have a pie crust ready. If you are interested in our pie crust you can check out

 We’re sort of steaming the ingredients in this pie. Let’s put this top crust on pinch together the edges well so it’s connected to the bottom crust. Finally, put 3 little slices in the top so this vents a little bit.


 There seems to be a modern resurgence in baking in Dutch ovens, but this technique has been used for hundreds of years. Dutch ovens were commonly used in 18th century kitchens. They were known by various names and they took on various forms, but they were known throughout Great Britain, France and the American colonies. Dutch ovens played an important role in the American colonies as well as the later on Western expansion. Louis and Clark took numerous Dutch ovens along on their western expedition. These vessels were favored by 18th, 19th, and even 20th century cooks and sojourners for their versatility. They could be used for soups and stews, for frying as well as for roasting and baking, even bread.
 When using a Dutch oven, you need to make sure that it is preheated. Just leave it in the fire pit until it’s good and warm. You have to get your pit ready for this. You need coals underneath your Dutch oven. Deciding exactly how many coals you want to use is a bit of a matter of judgement. Each person is going to have to get used to that. You need to practice. I put a ring of coals around the top of the lid here leaving the center a little bit open. Same thing at the bottom, there’s a little bit of opening at the very center to not get it too hot. Each one of those is going to be just a little bit different though. For even cooking you will want to rotate your Dutch oven every 5-10 minutes or so and you will want to check on your food about every 15 minutes to ensure that the oven is not too hot or cold and adjust accordingly.

 Combine flour, bread crumbs, raisins, sugar and ginger in one bowl. In another bowl beat together the eggs, yolks, and heavy cream. Combine all the ingredients for a nice thick batter. Turn out into a well buttered
  Allow pudding to cool then turn out onto plate, slice and cover with sauce.
 Today we are doing a savory Beef Steak Pie using our


 Gently place the pie into your preheated Dutch oven and replace the lid. We want maybe a scoop and a half of coals around the bottom edge of this Dutch oven and maybe two scoops on top, two and a half scoops max. We don’t want to overdo this or else our meat will be tough if we cook this at too high a temperature. We also want to make sure to remember that we need to continue to rotate this oven 90 degrees every 15 or 20 minutes and rotate the lid separately, because our coals might be hotter on one spot than the other and we don’t want to overcook one spot over another.
 When this pie is done, we definitely need to let this guy rest. It can even be eaten cold, and the colder we let this get, the more it’s going to come out in one piece.
 White pot is a sweet, buttery, bready, custard type bread pudding originating from 18th century Devon in southwest England. The term white pot simply means white pudding. Recipes for white pot changed very little over the years and between regions. They primarily consist of bread, sometimes rice, sugar, eggs, usually cream, some spice, and sometimes a little bit of fruit.
 We’re using our
  Butter each of these slices liberally on one side. You will end up using about a half a cup of butter or one full stick. While the butter is out, go ahead and butter your pan or tin as well. Make sure that this is buttered liberally as well or the sugar in the white pot will make it very difficult to release later.
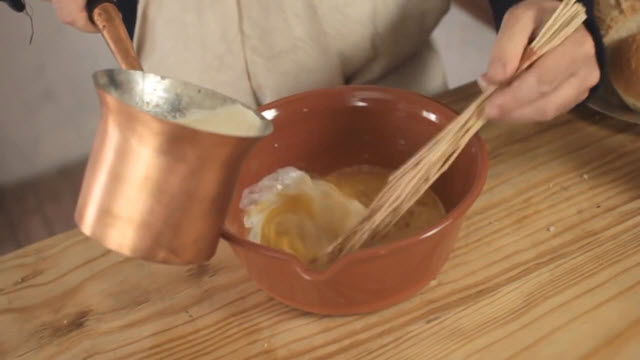
 Allow to cool for a few minutes and then turn out onto a plate. For added enjoyment, you can sprinkle some sugar on top and brown it using a heated
 There is a bread baking technique that has been floating around the internet since about 2007, but it’s not a new idea, it’s been around for hundreds of years. A very simple dough with high moisture content that is baked in a

 As soon as the dough is formed and all the flour is absorbed, it’s time to stop mixing because they call for this dough not to be kneaded. It makes a very wet and sticky dough, a very light paste.


